 Steve and I had far too much fun setting up and testing the Ring Video Doorbell from http://ring.com. Because it was so much fun I have way too much to say about it. I’m going to break this review down into segments that perhaps will help you understand the bits you care about and, if you read long enough, learn why we had to buy a Craftsman wood router. Oddly I’m going to start with the Bottom Line and then back into The Problem To Be Solved followed by Usage, and then by Setup & Troubleshooting. Installation is where I really start to ramble so we’ll do that last.
Bottom Line
Bottom line: the Ring Video Doorbell is really cool, it solves real problems and it only costs $200. Buy one. Here’s my Amazon Affiliate link.
The Problem to be Solved
Let’s make sure we have an idea of what problems the Ring should solve before we dig into how well it worked for us. If you had a device at your front door that provided video to your smart phone, you could answer the door without disclosing whether you were at home. You could pretend to be changing the baby even though you were actually in Italy. If this device also recorded video, when someone stole a package from your doorstep you might be able to help the police catch the miscreants. We all love caller ID on our phones so we can choose to whom to talk. What if you could screen visitors to your house by looking at them first and deciding if they were worthy of trooping downstairs to greet them? Maybe you’re a woman alone at home and really hate answering the door at night, maybe such a device would help you stay more secure. These are the problems that the Ring Video Doorbell solves.
Usage
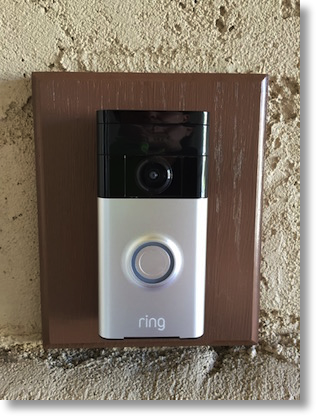 The Ring Video Doorbell (which I will call simply Ring from now on) replaces your existing doorbell and gives you a live video feed from your front door whenever its infrared sensor detects heat and motion within the region you define. When someone arrives on your doorstep, your iPhone, iPad, Android Phone, and Apple Watch all start to ring. Tap on the alert and the Ring app opens showing you live video of your door while playing audio on your mobile device. If you choose, you can tap the Talk button and the person will also hear you but never see you.
If you choose to pay $30 a year (not per month, per year) these videos are stored online for later viewing. You get a free month of stored video when you first get the device, so you can play around with it and see if it’s useful to you. I can’t imagine not buying the service because sometimes you’re indisposed and miss the alert so you really want to be able to open the app and see if you missed a friend or if your package got delivered. Ring operates off of an internal battery that they say lasts six months between charges, or you can hook it up to your old doorbell’s wiring for power. You’ll have to stick with me to the physical installation section to hear how that went for us.
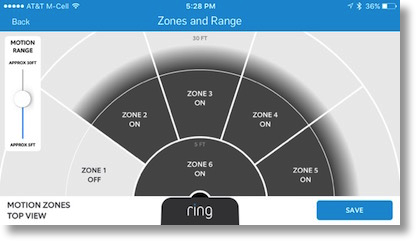 When we first set up the Ring, we got alerts every time a car drove by. Cars are hot so you’d expect that with an IR sensor but we don’t want that many false alerts. Luckily Ring has a solution: the Ring app has a sensitivity screen that shows you a semi circle cut into 5 angular zones. You can shut zones off one by one and you can drag a slider up and down to change the range within which you will get alerts. We’ve stopped the cars from sending alerts but our mail carriers are so fast that we have yet to catch them at the mailbox so we’re still fiddling with the settings. My only complaint with the sensitivity is that the text on screen is REALLY small. The slider says 30ft at the top and 5 ft at the lower end but I only know it says that because I took a screenshot and zoomed in on it!
 That got me thinking about accessibility. The good news is that the app for Ring works great with VoiceOver. I only found one button, the button to add a new device, that was not labeled or even identified as a button. I’m sure it’s an oversight and I shot off a note to Ring about it.
You can also change how many alerts you get if the motion continues, from light, to medium to frequent. We haven’t played around with that too much but it can be useful if someone is working on the front porch or you have kids playing in the front yard. Maybe you want to know the kids came home but you don’t need to hear about every pass of the football.
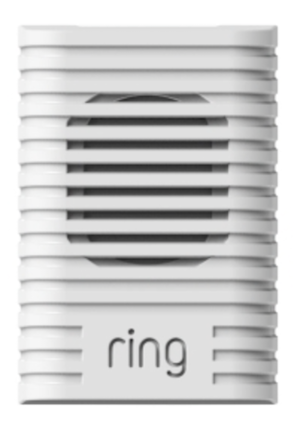
The folks at Ring also sent over what they call Chime. This is a very small device about the size of a small transformer that plugs into an outlet and rings when your Ring doorbell rings. This means you don’t have to have your phone with you to hear your doorbell in your home. Get this: the Chime can hook up to multiple Ring doorbells, and you can have multiple Chimes for a single Ring doorbell. Each Chime is only $30. I think that’s the perfect price point for this optional but very useful device.
 There is one thing I would change if I had my druthers. I would have the camera field of view biased much lower than it currently is. It gives a great view tilted upwards and shows me the ceiling of my front porch, but the view downward isn’t low enough to see the threshold of my door, which is where packages are left. We tried tilting it but it needs to be tilted down about 30° to see the ground in front of the door. We tried flipping it upside down, which SOUNDED like a good idea in our heads but then we realized the video would be upside down.
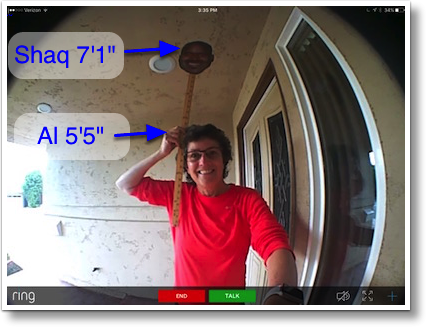
To illustrate how high the video goes, I printed a picture of basketball legend Shaquille O’Neal’s head (shaqshead.com) and taped it to a yard stick. Shaq is 7’1″ tall and I’m 5’5″ tall, so I held the yard stick with the top of Shaq’s head 20″ above the top of my head, then stood at a distance where I was comfortably touching the doorbell. Steve took a screenshot of the view from the Ring doorbell app and as you can see in the photo, there’s about 6 more inches above Shaq’s head that is still in view on the Ring app. I hope Shaq comes to visit some day but even with the Ring camera view 6 inches lower to get a better view of our threshold, I could still see his lovely face. That’s the kind of investigative journalism you get when you read and listen to the NosillaCast.
Setup
Now let’s talk about how to do the initial setup of the Ring Video doorbell. Ring works like many other wireless devices we’ve used for home automation like the Nest smoke detector and the Wemo Switches. They all pretty much work the same. You power up the device, and it creates it’s own little WiFi network. Using your smart phone, you connect to that little Wifi Network. Now the two can chat, so you tell the device about your real WiFi network including the password. Now your device is on the real WiFi network. While this isn’t super intuitive if you haven’t done something like this before, the Ring app is great at walking you through the steps and offers videos if you’re confused. When this method works, it takes maybe 3 minutes even if you have to go look up your network password.
But of course, nothing is ever that easy.
Troubleshooting
With our Wemos, our Nest and now the Ring, there have always been problems connecting with the WiFi. All of these devices work only on the 2.4GHz band, and we have both 5 and 2.4GHz networks. We separated the networks after the Wemos pitched a fit last year so we weren’t expecting a problem. The basic symptom was that on some iOS devices and not others we could get all the way to the last step after authenticating to our network with the Ring and the Chime and then it would fail.
I’m going to boil this part down but it took several support calls for us to reliably and easily connect our Ring and the Chime to our network. In every instance the people on the phone were resourceful, polite, not a lot of useless chit chat with fake sympathy and absolutely knew what they were talking about.
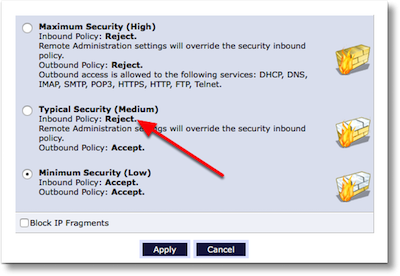 You may remember (or not) that I have a unique router situation where Bart helped me emasculate my Verizon Actiontec router so that I can use my Airport Extreme for DHCP and wireless access. On the final call with Ring that cracked the code, I showed my new best friend, Elijah, my network diagram. He suggested that the troubles I was having could potentially be caused by a firewall setting on the Verizon router.
He did a screen share to my Mac and we logged into the Actiontec Router from Verizon and in the Firewall settings we found that it was set to Typical Security which had an Inbound policy of Reject. That’s what you WANT a firewall to do by the way, to reject incoming traffic that you didn’t request. It’s unclear to me why the router interpreted this traffic as unrequested, but when we changed the security to Low, which accepts inbound traffic, I was able to complete the setup of the Chime. Of course we changed the security settings back to reject inbound requests immediately afterwards so my network was secured. I learned something and so did Elijah, and he was delighted that I sent him an annotated screenshot of the Verizon firewall settings (made with Clarify of course) for their files. I should mention that getting Elijah, the Ring support lead, on the phone on a Saturday was because Ring knew I was about to publish my review, but the other calls I made were anonymous and I got great support from them as well.
Installation
I know you’ve all been dying to hear about the physical installation. Like I mentioned earlier, the Ring doorbell installs in place of your existing doorbell and has a rechargeable battery. If you’re handy with electricity, you can connect it into the existing power from your old doorbell, and this will trickle charge the Ring battery. The requirement is that you have 8-24 Volt AC available at your doorbell. In our case, we have a fancy 1990’s intercom system so the doorbell rings throughout the house, but at the doorbell we only had DC power. I’m not going to go into the details of how Steve eventually was able to get AC to the front door, but I can tell you that if it had been me, I would have left it alone on battery! He had a few (successful) calls to Ring as well as he got it to work.
To install the Ring, you first mount a face plate to the wall and then you slide the Ring onto the faceplate and tighten two teeny tiny little 6-pointed Torx set screws to secure it to the face plate. We had to use my iFixit kit on this part because we had a ledge in the way but we were able to secure it in the end. A lot of people ask me, “What if someone steals your Ring?” Well think about it. First of all you’d have a VIDEO of them doing it to show the police. Second it takes about 10 minutes to undo those screws, and they’d also have to be packing that unusual tool. And finally if they were successful, Ring will simply give you a new one if someone steals yours. In the setup I forgot to mention that they show you a map of where they think the Ring is being installed with your exact address. I asked Ring about that and they said that if they see the Ring being installed at a different physical address they simply shut it off! So yeah, don’t worry about your Ring being stolen.
Ok, back to our adventure in installation. Unfortunately our fancy 1990s intercom was way bigger than the Ring face plate so there would have been a big gap around the Ring if we just slapped it up where the old one was. We decided to make a wood faceplate on which we could mount the Ring. We didn’t want to put any old chunk of wood up there, it must have some nice scalloped edges like you can create with a wood router. We’ve been wanting to buy a router for a long time so this gave us our excuse.
 Steve brought home a 1-3/4 HP Craftsman router and like any normal couple, we fought over who got to use it first. We compromised and took turns learning to use it on some test wood. Our first efforts with the router pretty much looked like a six year old did it! We practiced a whole bunch of times and we upped our game until it looked like an eight year old performed the job. It was sad.
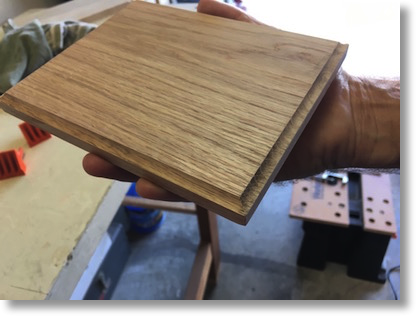 We then discovered that they have bits that help you guide the router if you don’t have a table (which we don’t) so back to the hardware store he went. This new bit worked like a champ. I think we were well above middle school level in the end.
You can find the Ring Video Doorbell and the Chime at ring.com and don’t forget my Amazon Affiliate link if you decide to buy.

While I don’t yet have a Ring video doorbell, I do have that exact same router, and I like it very much. Bearing guided bits are the way to go unless you sucumb to the noisy sirens song of the router table.
Chris – this comment has officially taken my top 10 list of favorite blog comments of all time. “noisy sirens song of the router table” is the best description ever.
Thanks for creating this website, it’s exactly what I’ve been looking for
I have to do this with my 90s doorbell as well. What type/size of screws did you use?
The Ring Doorbell comes with its own proprietary screws, Deanna, and a tool to remove them.