Apple Photos is a lot more capable than many people realize. I’m sure I still don’t use a great deal of the functionality myself, because I keep discovering new things it can do and new ways to use the capabilities that I already knew about. I just discovered a couple of cool uses of keywords in Apple Photos that I’d like to tell you about.
Before I dig into this, it is important to realize that Apple Photos does not by any stretch of the imagination, have the kind of keywording depth that you’ll find in something like Adobe Lightroom or the old Aperture program from Apple. The Allister Jenks type of people, who love to have embedded folders of keywords to a level that might require a clinical diagnosis, will not be even vaguely interested in what I’m going to teach you. For the rest of you, I think I’ve got some tips that might come in handy.
Problem to be Solved
 Let’s set up a problem to be solved with an example.
When we go on big vacations, I take an excessive number of photos. Maybe you do too. The only way you can get anyone to look at your photos is to narrow down the number you’re going to show. The first step in this process is called Barting your photos, named after Bart Busschots who taught us this concept. Barting your photos means throwing a lot of them away and keeping the better photos.
My Barting process is to go through them while I’m still on the trip and throw away around 20%. Then when I get home, I Bart them again. Each time you go through them, you’re comparing the photos to a smaller set, so it’s easy to eliminate another 20%. At this point, it’s still about 12 times as many photos as anyone will ever want to view, but I eventually get down to the images I actually want to keep.
My next strategy is to start marking my favorites from a given trip, with a keyword to designate them as a “best of”. A perfect example was our trip to Grand Teton National Park. I created a keyword “tetons best of”.
Keywording
I normally keyword in pretty much the hardest possible way because I keep forgetting about the easier ways. I’m hoping that by talking this through with you, I’ll remember to use the easy ways.
First, the hard way. You can do a Get Info on a single image using ?-I or Window ? Info, and there’s a field where you can type in keywords. If you’ve already created a keyword, it will autofill as you start to type, and if it doesn’t exist, Photos will create it.
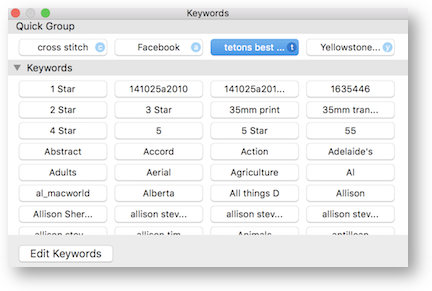
 If you’re doing a lot of keywording though, you might want to open the keyword manager by hitting ?-K (or Window ? Keyword Manager.)
The Photos Keyword Manager doesn’t support embedded keywords. You can’t say, have a keyword called flowers, and inside flowers have keywords for yellow, red and purple flowers. This is where the Allister Jenks types lose interest in Apple Photos. I do have to admit, this lack of keyword structure does result in a giant pile of unorganized keywords. The good news is that Photos includes something called Quick Group.
In the Keyword Manager, scroll till you find the keyword you want to use often. Then simply drag it up to the top section where it says Quick Group. Now you don’t have to scroll around to find it. If you keep the Keyword Manager up on screen, you can click on an image and then click on the keyword to apply.
But maybe that’s still too tedious. In the Keyword Manager, there’s an Edit keywords option, which allows you to create keystrokes to apply your favorite keywords. These don’t need to be big ol’ complex keystrokes like command-shift-option-f4; you can assign a single letter to keyword. While working on my Grand Teton photos, I added the letter t as the keystroke to invoke the Teton Best Of key word. I could select a bunch of images, and hit t, or it t one at a time as I scrolled thorough them. Once in a while I’d change my mind, that an image wasn’t worthy of the “best of” title, and I simply hit t again to remove that particular tag.
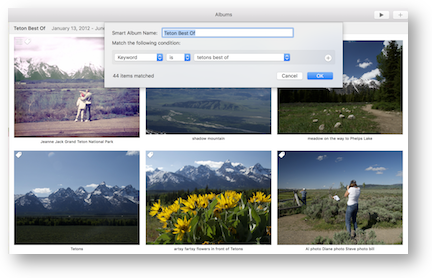
Ok, that was a long way of saying that you can keyword your photos. But that’s only the first step in making an album people will actually view. Once I keyworded my favorite images with Tetons Best Of, I created a Smart Album where the rule is that the keyword says “tetons best of”. It works really well and it’s super easy to set up.
After I created this smart album, I realized I’d included some images that weren’t actually that great, but all I had to do was tap the keyword again and the image immediately vaporized from the album.
Fixing Mistakes
I figured out something else cool to do with this. Before I realized how much easier it was to use the Keyword Manager and a keystroke, I was typing in the keywords on each photo’s Get Info window. But after I’d been working on it for a while, I realized I’d slipped a field and was typing my keywords into the description field. It was a mess! I had no idea how many images on which I’d made that mistake.
I created a new Smart Album, where the description was “Tetons best of” and a date range of 6/1-6/3. This gave me an album with all the incorrectly labeled images. Now I could open the get info window on these images, cut the words from the description and paste them into the keyword field, and as I fixed each one, they disappeared from my smart album. When they were all gone, I knew I’d gotten them all and I could delete the smart album.
Mixing Cameras
 I had another problem with my plethora of vacation photos. On the trip, I dragged all of my photos daily from the memory card of my Big Girl camera into Photos. I put them into named albums by date and what we saw that day so they were all neatly organized.
However, I had no Internets on the trip, so my iPhone shots were not in Photos and so weren’t available to organize. I got back home on good Internets and they all swooshed into Photos. But now in All Photos, the images from the phone are sprinkled about amongst my Big Girl camera photos. How do I find the iPhone photos and pull them into my carefully crafted albums?
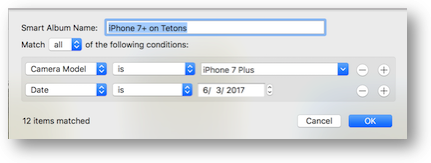
Smart Albums to the rescue again. I created a Smart Album with the date set to a specific day, and then set the camera type to iPhone 7+. Then I dragged that set into the album I’d created on the trip for that day. Next I changed the album smarts to the next day, and did a rinse and repeat. It only took me about 5 minutes to sort hundreds of images into the right folders using that technique. I have to say I was pretty proud of my little self.
As much as I use Apple Photos, I’m still finding out things it can do and ways to use the tools I did know about to make better images, make albums of images that people will actually view, and ways to speed up processing of my images.

I think you could also select multiple photos, call up an Info window, and add a Keyword or Description, which is then added to all the selected files simultaneously. This used to work but I haven’t tried it lately.
Probably Rick. I know you can add the same title to a bunch of images that way.
How is your process affected by keeping your photos on your Drobo? Do you also keep these photos on your Mac?
Oh gosh, Doug, I don’t keep my photos on my Drobo! They’re all resident locally on my internal SSD. For a while I tried having my photos on an external SSD but it was a pain, so I moved them back.