This week in our Google Plus group (podfeet.com/googleplus) Sandy Foster asked a dumb question, which as is usually the case, is not a dumb question at all. The story takes some winding paths, but I assure you that there’s a solution at the end of this story.
Her problem to be solved was that a friend of hers had a non-commercial DVD to which she had the rights to copy. Sandy volunteered to make duplicates for her friend because she knew it would be an easy task on a Mac. She spent two hours on the phone with AppleCare with both an advisor and then a senior advisor, neither of whom helped her figure out how to do this.
This sounded like a fun challenge, even though I haven’t burned a DVD myself in ages. Here was the process I suggested she try. (Spoiler, my first solution doesn’t work.)Start by using Disk Utility. In there choose File/New Image/Blank Image. Before progressing I told her to change the Image Format (the last pulldown) to DVD/CD Master.
Once you change that pulldown, Partitions will change to CD/DVD, and Size will have some DVD/CD options. My memory said that the right choice out of the list was 4.6GB DVD-R/DVD-RAM.
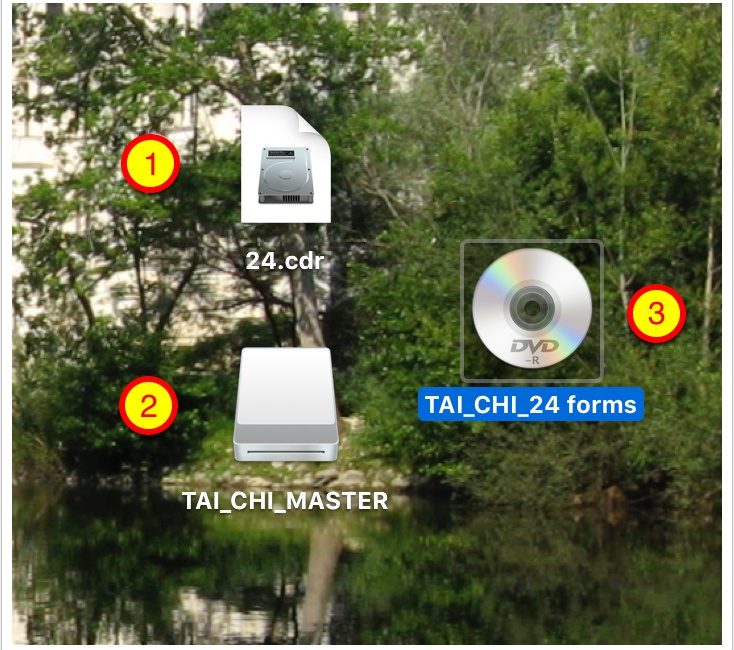
After you name it and save it as a .cdr file, double-click it to mount the image, and you should be able to put files into it, and then burn it.
I tested this process myself and it worked a champ. And by test, I mean right up to the point that I created the .cdr file. When Sandy tried it, all went as I described, except when she tried to drag her DVD contents into that image she was told the contents of the DVD wouldn’t fit in the newly created disk image.
I hadn’t checked how big that .cdr file was because I’d told it to be 4.6GB. But guess what? Disk Utility must be broken because the disk image it created is only 1.5GB. By the way, Sandy had been down this path with AppleCare and they told her that it was broken and hadn’t been updated in years.
They also told her to go download a 3rd-party app to get this done, and even made some suggestions. This was pretty surprising, and Sandy said the apps looked pretty dodgy.
I decided to go hunting on the interwebs for a solution, but like Sandy (and the Apple advisors) I could only find 3rd-party apps that suggested they could do the trick. But they all wanted money up front, and they weren’t in the $5-10 range that it was worth for Sandy to do her friend this favor.
I was still convinced there must be a path to success with Disk Utility so Sandy and I scheduled a screen sharing play date. We’ve had video play dates before, like the time she helped me figure out what was wrong with my sewing machine. Get this – I’ve had it about 20 years and I was threading it wrong!
Anyway, we decided to use the built-in screen sharing on Messages to work this out. If you tap on Details for a contact you’re chatting with you’ll see two overlapping blue rectangles. Tapping this gives you the option to share your screen or ask to see the other person’s screen. Once you’re seeing the other person’s screen, you can even request control! Now that I think about it, I should do a tutorial on that!
Anyway, Sandy and I got on our screen sharing session and we hammered away at this until we cracked the code. While the process of creating the DVD disk image ahead of time as a blank should have worked, since it didn’t, we abandoned that whole path and found another way to do it.
In Disk Utility you also have an option to create a new image directly from the original DVD source. You still have to pay close attention to the options and change the Image format to DVD/CD Master. Also make sure to change the save location, because by default, it will try to save the image inside the original DVD itself (which of course won’t work!)
We had a lovely time chatting about this and that while we hopefully watched it create the disk image. It took a long time which was a very good sign.
When it was done, there was a .cdr file on her desk, which when double-clicked created a disk image on her desktop with the same name as the original source DVD. The disk image didn’t look like a DVD yet, but it appeared to have the VIDEO_TS and AUDIO_TS folders in it and the accompanying VOB files you’re used to seeing on a DVD.
From there it was an easy trick to right click on the DVD disk image, select burn and replace the original DVD with a blank writeable DVD. We got to spend some more time chatting while it burned. I wasn’t going to hang up this close to the end because I wanted to see how it turned out!
When it was done burning, Apple’s DVD app wouldn’t play it but she popped it into her Blu-ray player and it worked like a champ! She later told me that it plays under VLC on her Mac too. We both did the happy dance that this finally worked out for her.
She was especially excited because her friend had stopped by earlier that day to see how she was coming along with the copying and she’d told her that she was pretty sure she wasn’t going to be able to help her after all.
When we were done, I asked Sandy if she’d go through the process again and this time take screen snapshots so I could make a tutorial with my beloved Clarify. It was fun figuring this out with Sandy and getting to collaborate on the documentation of our solution with her.
After all that fanfare, here’s a link to How to Duplicate a DVD on macOS Sierra. You can always find it again by going to Podfeet.com and clicking on the Tutorials button. From there you can click on the Mac Tutorials section.
Enjoy!
A similar problem we had today, we tried to burn a copy of a home movie dvd using disk utility and we’ve screwed up apparently in doing so. The disk image was useless and was trashed. Now the original dvd’s title has changed and it won’t play on the MacBook we tried to copy it to. However though the title has changed it will play on my Mac. We can’t figure out what to do, nobody addressing this problem online. Can you help? Desperately need this fixed. Thanks-