Whenever I go on one of our big adventures, I learn something new about the tech I want to use on travel and how to get it to work best for me. It’s an evolving story that I think is helpful to document. This isn’t one, nice, cohesive explanation but rather a list of disparate items that affect how to attack the problems of tech on a big trip.
Diagramming a Trip
This year’s trip was to Chile to see a total eclipse of the Sun. While in Chile, we toured three major telescope facilities and traveled from the shore to the middle of the Atacama Desert to a mountain at 16,500 feet. In order to achieve this task, we took 7 plane flights, stayed in 4 different hotels, spent 2 nights on planes, and rode 1219 miles on a tour bus.
Before we embark on an adventure of this magnitude and complexity, I like to make a diagram of the trip. We usually have a nicely written, multi-page description of the trip, but a diagram gives us situational awareness at a glance. You may think me anal (and I probably am) but it is so very helpful on the trip to know what’s about to happen and when.

Back in August of 2016, I told you about an amazing web app called Draw.io (https://draw.io). Think Omnigraffle with fewer features but completely free of cost. It doesn’t work well on Safari, but it’s not half bad on Chrome. The app allows you to drop in rectangles and other shapes, other graphics, and most importantly lines with arrows that magnetically connect the blocks of information.
I settled a long time ago on rounded rectangles with a nice gradient blue for the city names, bright yellow rectangles containing the hotel information, bright green rectangles with white text that ride on the arrowed lines for the flight numbers and dates, and this year I added salmon-colored rectangles for the daily excursions. One of the most important features of the diagrams is the red, sequential numbers I place on the lines so you can follow along on the trip. On each arrowed line I not only put the green flight info and the red numbers, I also put times AND dates if there are flights on that line. I remember when we flew into Tahiti after being in New Zealand and crossed the international dateline – that date on the line kept us from booking the wrong night at the hotel in Tahiti!
As I’m building up the diagram, I often realize that I’ve not left enough room for some information, or it’s too crowded in one spot, or perhaps the location on the diagram doesn’t represent the direction of travel as well as it could. If you’re careful when creating the connecting lines in Draw.io, they will be magnetically attached to the boxes. That means you can drag the boxes around on screen and the arrows will somewhat follow along and keep their flight numbers and sequence numbers and dates attached. It’s not perfect, and does take some fiddling around but with some practice you I’ve gotten pretty good at it.
On this trip, I whipped out my diagram about 30 times and I was happy every time that I had it available. I printed it out and put it in a plastic sleeve, but I also put it in Google Drive and marked it for offline viewing. A few people on our tour seemed to think it was cool (or at least humored me when I showed it to them).
On one of the early small plane flights I ran into a couple of doctors who were on parallel trip tours but from one of the big Ivy league schools and they LOVED it. They didn’t say that just to shut me up for the plane flight either. The woman wrote down draw.io in a notebook when I told her about it. Then near the end of the trip, I ran into them again and she introduced me to a friend of hers and said, “This is the woman that made that awesome trip diagram I was telling you about!”
Heck, I even use a draw.io diagram to plan our Christmas holiday adventures. We’ve got 6 adults, 1 baby, 3 dogs and 2 cats, and we have quite a juggle to make sure that everyone’s family and in-law families get some portion of everyone’s time. It’s really quite hilarious that we require this level of effort but the diagram once revealed that Lindsay’s dog Dodger was going to have to drive himself to wine country if we didn’t take him into account.
If you do any complex trips, I highly recommend draw.io for making a diagram. When we went to the Galapagos in Ecuador and Machu Picchu in Peru, we discovered because of my diagram that our travel agent had neglected to actually book two of our flights in those countries!
Camera Setup Before Trip
Two camera items really paid off on this trip. I carry my iPhone of course, but I also travel with my big-girl camera, an Olympus EM-5 Mark II. For the very first time ever, I remembered to go into the camera settings and change the time on the camera. In Apple Photos, images are sorted by the date and time they were taken, so without doing this my Olympus photos and my iPhone photos would not be sequentially next to each other in the right time order. I’m very pleased with that I remembered because this is the first time EVER I’ve remembered to do it before I left! This time I even remembered to change it back when I got home.

The second camera-related item is something I cannot take credit for. Credit goes to my friend Diane. A few years ago we went on a trip to Yellowstone and Grand Teton. In preparation for the trip, she bought a pair of plastic rain covers for big-girl cameras because she worried there might be rain (and she was right) and she gave one to me.
These rain covers are essentially a plastic bag sleeve with both ends open. You slide the plastic sleeve over the camera and on the end where the lens is, you have a small drawstring to pull it tight around the end of the lens, which allows the lens to actually still take photos. The other end of the sleeve has a much larger opening, allowing you to get your hand inside to manipulate the camera, pulling out the zoom and hitting the shutter.
I keep my rain cover folded up neatly in my camera bag, but that bag is too bulky to go on travel with me. In a stroke of genius, I pulled the rain cover out and put it in my backpack before we left. At one point on the tour we went out in 14-foot fishing boats in very high seas to Isla Choros and Isla Damas to see the local wildlife. Many of the jolly travelers got soaked with waves.
My new EM-5 is actually water resistant, but my lens is definitely not. I was fairly shielded from those big waves but the amount of spray could easily have destroyed my lens, if not for Diane’s rain cover. I put a link in the shownotes to the ones she got me – they’re only $7 for a pair on Amazon. Good thing, because the cover blew off as I got out of the boat! I immediately replaced it.
Speaking of things I lose often, near the beginning of the trip I explained to one of my new friends that I always lose lens caps on travel. I told her that I’ve trained my friends to listen to the sound of it dropping when I bump it off as I swing the camera around. Evidently she wasn’t that alert, I lost a lens cap partway through the trip. I buy them by the sleeve now – this is the 8th time I’ve replaced it!
Update on Google Fi
 In 2017, Mike Elgan came on Chit Chat Across the Pond and told us about something called Google Fi, a SIM card he recommended for international travel. I acquired my own, wrote a blog post about it and have been using it ever since. It’s so awesome that I actually loan it out to friends. My buddy Ron took used it in Australia, Dorothy used it in Scotland, and Niraj used it in Morocco.
I wanted to give you an update on how it works because it’s changed a bit, and perhaps you didn’t hear about it back 2 years ago.
Here’s the deal now. You ask Google for one of the SIM cards for free at fi.google.com, or you can buy one for $10 at Best Buy. If you buy one, that $10 goes towards your first bill. The first card you get is a voice and data card, but you can get as many additional data-only cards as you want.
One big advantage of the extra data cards is that you share the plan with the family. You don’t have to acquire a separate card with a separate payment for each person.
The Fi service costs $20/month and then you pay $10/GB. Here’s what’s amazing though. That fee is prorated. So if you only need the service for a week in Bermuda, it’s only 1/4th of $20 or $5 for that time. And the data usage is prorated as well. You don’t buy it in chunks. For example, if you use 3.2GB, it’s $32.
But here’s a HUGE improvement they made to the plan. After you hit 6GB, they don’t charge you any more during that billing cycle. They don’t even start slowing you down till you hit 15GB! Steve and I weren’t cautious with our data usage in Chile, and we sorta forgot to turn off iCloud syncing of our documents and desktops. We took a ton of photos that went whooshing up and down to the Internets and back and the WiFi in the hotels wasn’t very good. Combined, we used 20.5GB, and our total bills as $83.61 including taxes and fees.
They made one other improvement and took away one thing. When I originally got the Google Fi cards, you had to buy an Android phone to initialize the card, and it had to be one of a very specific set of Android phones sold by Google. I bought the cheapest one, a Google Nexus 5X. Once you initialized the cards though, you could plop them in an iPhone and you were good to go.
Recently Google announced native support for iOS. This means you don’t have to buy an Android phone if you don’t want to. The bad news is that when they started official support for iOS, they took away the ability to tether. If you’re a sane person, you travel with an iPhone and maybe an iPad, but Steve and I carry along our laptops too so tethering is essential for our entertainment.
I brought the Nexus 5X along on the trip, and by a twist of fate I had accidentally bought the one with the European plug, so it worked great in Chile. It’s USB-C so easy to swap out but still was nice to have one device that I didn’t have to tack onto an adapter.
I mentioned that Google slows you down after 15GB but to be honest, we had pretty poor connectivity in Chile so it didn’t matter much to us. In other countries, like Peru, we had lots of LTE and Google Fi worked great.
When I was double checking my facts on Google Fi for my notes, I realized that they have an affiliate program. If you’ve been intrigued enough by my praise for Google Fi to check it out for yourself, it would be swell if you used my affiliate code. I almost forgot to mention – you can use it inside your home country as well. I think I might keep it on since I have a sim slot in my new iPad mini. Fun to have cellular back on the iPad.
Laptops on Travel
I mentioned that Steve and I tote laptops on big trips, and we both have really good excuses. I write a very lengthy travelogue when we go on our big trips. It’s very entertaining. Here’s a totally unbiased email I got this year about it:
I can not tell you how much I have enjoyed your emails about your trip. I have looked forward to each days adventures. I really have learned a lot from you, and have laughed a lot. You have such a great way of making your adventures fun and exciting.
Ok, it was my cousin Ann but still. Anyway, on this I wrote about 10,000 words total and I insert photos throughout my monologue to entertain. I don’t think I could do as good of a job with an iPad especially pulling in photos from my big-girl camera and editing them.
If you are a glutton for punishment, you can download an ePub version of my travelogue. If you click the link, it should open in Apple Books on an iOS or macOS device. Not sure what happens on other devices. The book is quite large (90MB because of all the embedded photos) so it may take a minute or two for you to see “open in Books” on screen.
Download ePub version of Allison & Steve’s Chile Eclipse Travelogue
Steve takes video on these trips using a big-boy video camera, and a Go Pro Hero 5 and he takes 360 photos using his Ricoh Theta S. It’s not practical to edit and move video and photos like the 360 ones using iOS. Even if it was, Steve really truly hates using iOS on an iPad.
When we did the Galapagos/Machu Picchu trip, we debated long and hard on whether to take our nearly new MacBook Pro laptops with us. We finally decided to take our older spares. Steve carried an old MacBook Air and I carried my 2013 MacBook Pro. We certainly made the right decision. You may remember that Steve’s backpack got stolen in the airport in Cusco, Peru and amongst other electronics, his old MacBook Air was in that bag.

Needless to say, we didn’t take our no longer new but still pretty young MacBook Pros with us on this trip either. I used my 2013 MacBook Pro which shockingly is still really really good.
I know I’m supposed to hate the new MacBook Pro keyboards, but I don’t. I do truly dislike the old spongy keyboards from 2013 though. I feel like I’m typing by remote control it’s so un-clicky! I also truly hate having dedicated ports. No USB-C back then so I only had 2 USB-A ports and I had the Magsafe connector I thought I loved but I really hate now. Every single time I went to plug into power, that darn thing was on the wrong side.
Last Christmas we gave Kyle a new 13″ MacBook Pro and I took back the 2015 12″ MacBook. Steve used that laptop as his device of choice on the trip. It wasn’t exactly the video powerhouse he was used to but I didn’t hear a single complaint from him about it. I had given him the choice of the 14 lb 2013 15″ MacBook Pro but he went for low power but super light instead. He said, “it was better than an iPad!”
Speaking of iPads, I brought two with me. I like to travel light, you know? I brought the 12.9″ iPad Pro with the awesome Apple keyboard and I actually used it a lot. I said it was essential that I had my laptop with me so I could write my long letters, but I actually did a fair bit of writing on my big-girl iPad. On normal trips I have a few hours of down time each day to do my writing, but on this trip, every spare moment was spent on the bus getting from here to there. If I was going to get the letters out daily, I would have to leverage that time. I wrote my letters in Apple Notes, and it was very easy to hand Steve the iPad to check my work and make suggestions. I couldn’t easily insert photos so I just made notes of insertion points and finished them up on my Mac when we finally reached our hotel.
When I bought the iPad mini this year, I asked the question of whether it had a place in my life. I have to admit that I’m not using it nearly as much as I thought I would. Without a real keyboard, I don’t gravitate towards it. In fact, on this trip, I never once took it out of my bag. I even forgot it was in there when I went through security on the last leg of the trip, so that was swell.
The Eclipse Itself

I loved the entire trip to Chile and especially the tours of telescopes and the astrophysics lectures, but the real star of the show (if you’ll forgive the pun) was the total eclipse of the sun. We drove to a town called Vicuña and to a place within the town called Alfa Aldeal, which is an astronomical center. All of the University alumni associations were there, each with a dedicated white tent with elegant table settings for our dining pleasure, and each with a dedicated standing area for the eclipse. It was extraordinarily civilized.
I forget if I talked about it on the show, or if Bart or Allister talked about it, but Bart asked Steve come on Let’s Talk Photography to explain how he uses time-lapse photography and specifically what he’s done in the past with eclipses we’ve viewed. It’s a great interview (I may be biased) and you can find it at the link in the shownotes to lets-talk.ie/… as episode #69.
Steve uses a big-boy video camera as I mentioned, but watching several hours of footage doesn’t really work to capture how astonishing the sight is. After coming home from the trip, he produced three different ways to experience the eclipse.
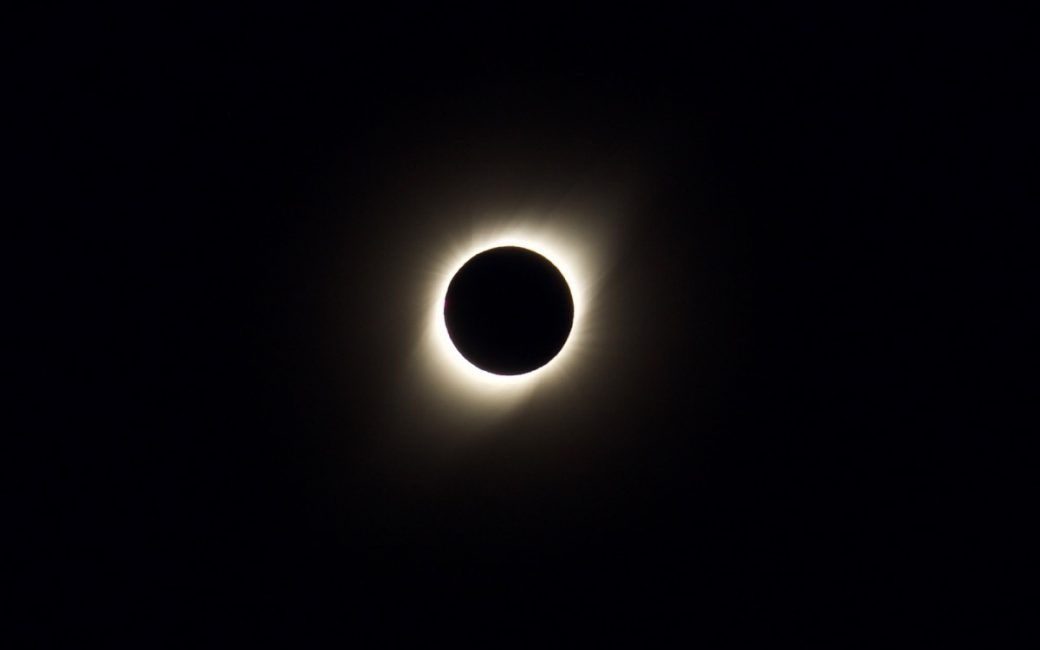
He’s got a 1:01 minute long video of the eclipse itself where he uses a solar filter on his camera right up until the moment called the diamond ring. That’s where there’s a bright flash of light on one side immediately before totality. At totality though, you can stare right at the sun without protective eyewear, so he removes the filter so you can see the ring of light called the solar corona as well as solar prominences in a few spots on the ring.
But watching this video doesn’t convey the feeling we experienced, it’s more science-interesting. In order to capture the feeling, he pointed his GoPro Hero 5 at the audience. He wanted to truly capture how dark it gets at totality but left to its own devices, the GoPro will compensate for the lack of light and increase the exposure, ruining the effect. This year he figured out how to keep the exposure fixed. The camera also catches our screams of delight, and even the sounds of people farther away who see the eclipse a second or two before we do.
I didn’t bring a solar filter for my camera because I didn’t want the temptation to spend the time fooling with camera settings instead of experiencing this extraordinary event. However, shortly before totality, my new friend Mark showed me a table he’d printed from the Internets that let you choose an f-stop and an ISO and then it would tell you the shutter speed to set. On a lark, I set my camera to manual and made my choices and waited.
After totality had started (the truly mind-blowing part), we had 2 minutes and 25 seconds left, so I turned on my camera, took a shot, saw it was underexposed, made some adjustments, still too dark and then took a third shot. The photo I was able to get is the best photo I’ve ever taken in my life. I should throw my camera away now because I will never take a better shot.
Steve’s GoPro video was great but it was missing something – the eclipse itself. So Steve pulled my photo into the video and timed it perfectly to be what you see right when our squeals of delight hit a crescendo. The video is only 1:01 long and it gives me absolute chills every time I see it.
Once totality is complete, it actually gets kind of boring. Imagine watching fireworks, seeing the grand finale, but then they kept going by doing one-off fireworks. You know you should stay and watch but it’s just not the same. For this eclipse though, there was one more very cool trick.
Totality ended around 4:40 pm, about a half hour before sunset, and we were in a valley with mountains to our left, which meant that the sun would set while it was still in partial eclipse. The site of the setting sun as a crescent was extraordinarily cool. And luckily, our intrepid videographer Steve created one more time-lapse video for you. This one is only 30 seconds long, and like the others, it gives me chills every single time.