A Little Back Story
I started using portable USB-C displays when on travel about 4 years ago, starting with the tiny 12″ Eyoyo 2K display. When that one died, I upgraded in 2021 to the Cocopar 15.6″ 1080P display. I missed the higher resolution of the smaller display, but the Cocopar was good enough that I was able to do the live show on the road. I liked the built-in kickstand which gave me enough space on my work surface to fit all of my gear. For $180 it’s still a very good option.
I showed my daughter Lindsay the Cocopar and let her use it at her house and she loved it. As a good mom, I really had no choice but to give it to her to support her remote work. She also runs audits at her company and having a second display in the conference room is life-changing. She says she should get a commission from Cocopar because so many clients have bought their own after seeing hers.
That was great because it gave me the excuse I needed to upgrade again. In 2023, I bought the KYY 4K 15.6″ USB-C Display for $239 (it’s now down to $219). I was delighted to have that super-sharp 4K goodness, allowing me to get a lot more information on my display. I need every single pixel when I’m on the road doing the show.

While the KYY’s display is gorgeous, I am continually frustrated with its lack of a kickstand. I know that sounds like a tiny complaint, but it’s a very big deal. Instead of a kickstand, the KYY has a floopy folio case that folds into a stand. It’s held on by magnets, much like the folio made by Apple for iPad, except the magnets aren’t strong enough so it falls off easily, and the little detents to hold it at different angles are not deep enough so it sort of slides out and flattens itself.
If I can get it balanced just right, the part of the case that sits flat on the table sticks out so far in front that it gets in my way. I can’t get the display close enough to my MacBook to be as useful as it could be.
In my review of the KYY, I told you I bought a little plastic tablet holder stand to hold it up, but that really doesn’t work very well because the display is so wide. It’s highly likely to get knocked over while I’m moving things around.
Oh, and one more thing that makes the KYY a little harder to use, is that the cables stick straight out of the right-hand side, and I prefer my display to be to the left of my Mac. That means in addition to being limited by the floopy case, I’m also limited by how much those cables stick out and keep my laptop away from the display.
But dang, that 4K looks great right up until it falls over.
History Lesson is Over – Enter RICOH Displays
Now that you’re up to speed with where we left our hero a year ago, let’s talk about the latest display in my life. At CES this year, I interviewed Scott Francis from RICOH about two of their portable displays. They were kind enough to send me one of them for review.
The two displays RICOH showed off were the model 150, which is a wired USB-C display, and the 150BW which can be used wirelessly or via USB-C. RICOH sent me the 150BW and I was excited to test it out.
The RICOH displays are OLED, but they aren’t 4K, they’re only 1080p. I hadn’t appreciated why people are so excited about OLED displays until I got the RICOH 150BW in my hot little hands. It is bright, the colors are vivid and it’s simply gorgeous. Every person I’ve shown the 150BW to says, “Wow!” It’s really stunning.
I also didn’t realize that OLED displays are thinner and lighter than traditional LCD panels. With a built-in kickstand, the 150BW weighs just under 1.6 lbs. The Cocopar with its required floopy case weighs 2.4 lbs which is 50% heavier. The wired RICOH 150 is even lighter at only 1.23 lbs. That’s crazy pants.
It wasn’t until I tried to take a photograph of the RICOH display for the show notes that I realized this is a very glossy screen, while the KYY is a matt screen. I like a glossy screen but we all know that George from Tulsa does not, so I thought I’d mention it.

The RICOH displays are a fair bit more expensive than all of the displays I’ve mentioned. The 150BW wireless display retails for $675 and the wired 150 will run you $530 on Amazon. If you buy direct from the RICOH website you’ll pay even more.
Wireless Mode on the 150BW
I was super excited to see what it was like to use the RICOH 150BW in its wireless mode. Wouldn’t it be glorious if we didn’t have to contend with the wires sticking out of the side of our laptops and displays at all?
There was no manual in the box, so I started fiddling around with the controls on the back right and figured out how to get into a WiFi mode. I looked in System Settings on my Mac and tried to connect to the WiFi network that the 150BW had created.
It asked me for a password. I figured it had to be something simple, so I did a bit of the googles as one does and found it was admin123. (I also found out where to change that).
After I entered the password, nothing happened. The display didn’t magically show up as a screen for my Mac. It was time for desperate measures. I broke down and started searching for the manual for the RICOH displays. It wasn’t easy but I finally found both the display manual, and the wireless manual. The wireless manual wasn’t helpful because it had more to do with other types of devices sold by RICOH like their line of scanners.
But in the regular manual, I found the very bad news about how the wireless functionality works on the RICOH 150BW. To use the 150BW wirelessly with a Mac, iOS device, or Windows PC, you have to download driver software called RICOH Monitor Mirroring.
Notice that word — mirroring. Yep, you can’t extend your desktop wirelessly, you can only mirror your display. This doesn’t solve any problem I have at all, but it may for you. If you give demos to people in rooms without projectors, I can see being able to pass around a wireless (and gorgeous) display so they can see what you’re doing.
Most corporate IT departments have locked devices down so you can’t just install any old driver you want, so you might not even be allowed to use the RICOH 150BW in wireless mirroring mode.
I did test it in wireless mirrored mode on my Mac, and I have to say the screen looked significantly worse in wireless mode than it did wired via USB-C. The text was smeary and the cursor lagged to the point I wouldn’t consider using it.
I can’t really recommend the RICOH 150BW, but let’s not stop there.
How About that Wired Mode?
I don’t want this to be a downer review, so let’s set aside the wireless functionality and I’ll talk about the 150BW as though it was the 150 wired version.
If you’re a Windows user, the RICOH display is a touchscreen with 10 independent touchpoints. They sell an active electrostatic stylus with 4096 levels of pressure sensitivity and two function buttons. I really wish I could test the touchscreen and the stylus, but since macOS isn’t a touch operating system, I don’t get to have any fun with it.
The 150 series displays have a power switch on the right-hand side, which means it doesn’t automatically come on when you connect it to your device. I can see scenarios where I’d want to leave it connected but also power it down.
Speaking of power, you definitely want to take advantage of power pass-thru with the RICOH displays. They have two USB-C ports on the back, and without adding power to the second one, the display drained the battery on my devices at an alarming rate. In my tests with a 12.9″ iPad Pro, the battery went from 22% to 7% in less than 10 minutes. The 150BW has an internal battery since it can work wirelessly, so it’s charging from my device. I’m pretty sure the model 150 would not drain your battery nearly as much.

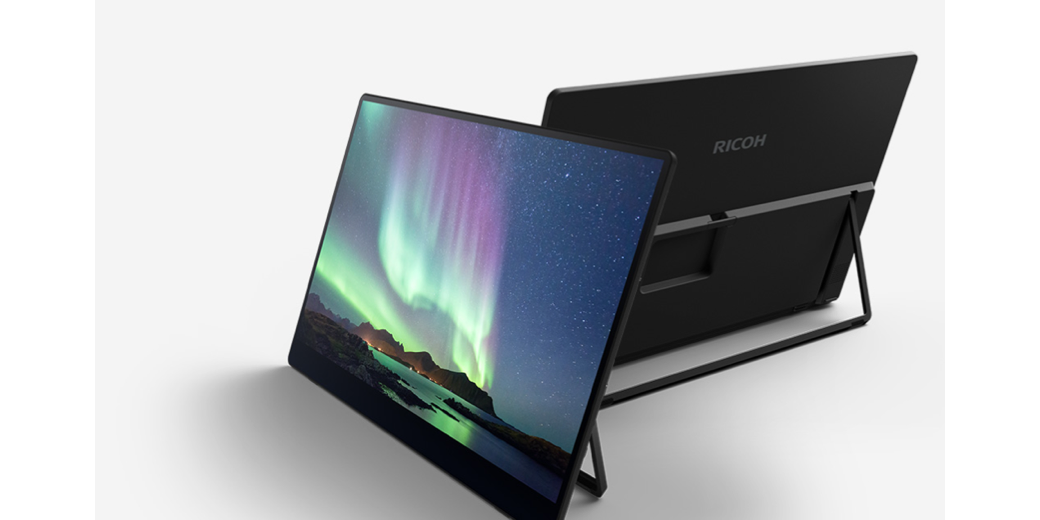
Speaking of cabling, I love the way they designed the cable management. Remember how with the KYY the cables come out of the right side of the display, limiting how close I can put the display to my laptop? Not so with the RICOH displays.
The display is of two thicknesses. The top half is only .19 inches thick, which is bananas thin. The bottom half is thicker as it contains the electronics. It also has a cutout for the two USB-C ports. This means when the power and data cables are connected, they lay flat on the back of the device. They also included four little clips that you double-back tape to the back, which allows you to hold the entire included USB-C cable on the thinner part for storage. Not having to find a place to store the cable is genius.


The thicker part also holds the built-in kickstand, which is another glorious part of the device. You can set the kickstand anywhere from nearly vertical at 75° down to a very shallow 16° angle which would be great for doing artsy things with that nice stylus. It’s a very wide kickstand, just short of the full width of the display so it’s super stable, unlike that floopy case on the KYY. You can even use the RICOH display in portrait because of the great kickstand which is really useful when reading long-form documents.
The display has two stereo speakers, but they’re pretty tinny so I don’t think you’ll be listening to them for any length of time. In my iPad Pro test, the audio automatically switched to the display’s speakers, but with Control Center I was able to change the speakers back to the iPad.
I’ve not used an external display on iPad very often so maybe I’m acting like I made fire here when I tell you how cool it is with the RICOH display. I opened Downcast on iPad and played the latest video podcast of the Daily Tech News Show. It automatically opened the video on that glorious screen while leaving the controls for the app on the iPad.
When using an external display with iOS, you choose where apps open using Stage Manager. You control it using the three dots at the top of the screen in any app. You get to choose from Full Screen, Split View, Slide Over, or Move to Display. It’s also interesting to see Display arrangement controls appear inside System Settings for iOS.
I don’t do a whole lot of productivity work on my iPad other than pure writing for the show, so I don’t have a big need to connect an external display but it works really well and again, the RICOH display looks fantastic.
My primary usage for an external display is when I go to Lindsay’s house and want to do the live show from there. On our latest trip, I carried the RICOH display instead of the KYY and it was awesome. It comes with a very thin zipper case to protect the surface of the display, but I slid that into a thick, padded case because it does feel fragile being so thin.
I used the RICOH display on my grandson Forbes’s desk along with a mic on a tripod, and a light, and a Thunderbolt hub, and cables running all over the place. While it’s still hard to work with all that mess, the display was no longer a contributor to my stress. The cables were out of my way and the kickstand was sturdy and didn’t get in my way at all. A perfect experience.

If I had to choose again, I would definitely choose the RICOH 150 OLED 1080p display to take on the road over the KYY 4K display with its awful case. Weight, thickness, cable management, brightness, vivid colors AND the kickstand all make this display an excellent choice.
But My Eye Wanders
But another display has my eye. Dave Hamilton of the Mac Geek Gab and I have been trading ideas on displays for a while now, and after he bought the KYY on my recommendation, he tried out a display from ViewSonic that won over his heart — the VX1655-4K-OLED. It might be the best of both worlds — OLED and 4K.
Like the RICOH, it has a kickstand which is table stakes for me now. The cables come out of the side of the kickstand close to the middle of the display so I suspect that’s a game changer from the KYY. So it’s got the kickstand, it’s 4K, it’s OLED, it’s got good cable management. What’s not to like?
At $500 the Viewsonic VX1655-4K-OLED is right in line with the price of the RICOH wired 150, but it’s 4K instead of 1080P. It weighs 1.8 lbs whereas the wired 150 from RICOH only weighs 1.2 lbs, but I’d give up 10 oz to get 4K.
Like I said, I’m tempted…
Bottom Line
The bottom line is that there is a lot of great competition in the category of USB-C portable displays, and they have options for every budget. My advice would be to make it a drop-dead requirement that whatever display you buy comes with its own built-in kickstand.
If you’re budget-conscious, I’d look for a 1080P LCD display with a kickstand. If your eyes are really good so you can appreciate crisp text, or you really need to pack in as much onscreen as possible, move up to a 4K display with a kickstand. If you’re not picky about crisp text, but you appreciate vibrant colors, then move to an OLED display with a kickstand like the glorious RICOH 150. But if you have to have it all and your financial advisor allows it, get a 4K OLED display with a kickstand. But whatever you do, get one with a kickstand.
I’m thinking of returning my UPERFECT monitor and ordering this but I haven’t found much online about it. So thanks for the detailed review.
Take a look at this Viewsonic review I wrote up – it’s better than the RICOH for the same price. OLEF and 4K and a kickstand and ok cable management.
https://www.podfeet.com/blog/2024/04/viewsonic-4k-oled/