Whenever Steve and I go on our wild adventures, I find myself learning something new about how to use our technology when away from home. The problems and solutions evolve over time. I wanted to give you a few things we learned on our Antarctica/Argentina/Brazil trip – some of which are successes and some of which are failures.

Connectivity on Travel
For many years I’ve sung the virtues of Google Fi for International data for our cell phones. The model is pretty cool. You get one primary card with voice and data, and up to 4 or 5 (I forget which) data-only cards. You pay a monthly fee of $20, and then it’s only $10/GB up to 6 GB, and after that limit, you don’t pay any more.
Because Steve and I could share a plan, we knew we’d never pay more than $80 no matter how much data we used. The other beauty of this plan is that you can turn it on and off at will so you only pay the $20/month when you’re using it.
For a long time, I didn’t understand one subtlety of the plan. While it’s $20/month, if your trip extends across two billing cycles, you’ll actually pay $40 for the service, bringing the potential cost to $100 for a trip. We found this out when I loaned the cards to Dorothy when she went to Ireland and visited Bart, and she ended up paying $20 more than I had promised her.
When we went on vacation with our kids, it worked out to be a pretty good deal because I could hand out all the data cards and pay no more than for just one of us.
It was a hassle-free way to go because I knew I could stick the cards in and go to pretty much any country in the world and it would work.
On the Mac Geek Gab, I heard Dave Hamilton talking about getting a data plan through a site called esimdb.com. I didn’t pay much attention to it, because I assumed that paying for two cards for Steve and me would be an inefficient way to use data making the total cost more, and a hassle to track.
Before we left for Antarctica, I decided to check it out anyway and I’m sure glad I did. International data plans have gotten way way way cheaper than back when I originally set up Google Fi!
Dave recommends esimdb.com because it is a broker for data providers all over the world. You enter the country or region you’re going to visit, and you’ll see a list of options from different companies vying for your business. They offer different duration plans ( e.g. 1 day, 3 days, 15 days, 30 days) and within those durations, they offer different amounts of data. Let’s say you’re going to be in Spain for 3 days, you might only need 1GB or even 500MB. But if you’re going to South America for 2 weeks you’d want a longer plan with lots of data.

At first, I searched for Antarctica and discovered that there is no cell data on the entire continent! That wouldn’t end up being a problem since we had satellite Internet on the ship, but it was still interesting. I was also surprised that satellite coverage existed as far south as the southern tip of Argentina. We’ll get into that later.

On esimdb.com, you can also choose a plan with voice service, but it immediately increased the cost to a level I didn’t think was worth it. I knew that my friends and family could use FaceTime Audio in an emergency since they’re mostly on iOS. As it turned out, Lindsay was able to call me on Telegram audio so even if she had been on Android it was possible to talk in voice without paying for a voice plan.
The newer iPhones have the capability to use multiple eSIMS and no physical SIMs. This paralyzed me at first because I understood how to sit in a tiny airplane coach seat and change out microscopic digital cards without dropping them. What was this sorcery of an electronic SIM? How could it even work?

When you download an app like the one for GigSky, you tell it the same info you did on the esimdb.com website, choose the plan, and then put in your credit card. The other cool part of this is that you can always top up your plan if you run low. I didn’t test this, but I suspect you need to top up before you actually run out.
And now for the pricing – Steve and I each paid $14.40 for 5GB for 30 days! I didn’t really need 30 days and I probably didn’t need 5GB, but how could I turn down less than $30 for the two of us?
Had I stuck with Google Fi, it would have been $100 because we did straddle a billing month, so we saved $70.
Most people we met on the trip just let AT&T or Verizon start charging them for International data, which is $10 per day. I’m not sure if they were charged while we were in Antarctica, but even if they weren’t, we were in Argentina for 6 days so that would have been $60 per person or $120 for the two of us. And again, we paid less than $30.
Out of the 5GB we each paid for, I ended the trip with 1.8GB leftover and Steve had 3.2GB left, so even at only $14.40 each, I could have bought an even less expensive data plan! Needless to say, I’m a big fan of esimdb!
Photos on the Ship
Before we left for the trip, Steve and I updated our M1 Macs and our iPhones 14 Pro to macOS Ventura and iOS 16 respectively. We turned on the new Shared Photo Library feature and ran some tests so we were sure we understood how it would work. We wanted to have a Shared Photo Library so that every picture either of us took on the trip would be on all of our devices.
In the camera app, you can enable the Shared Library so that every photo you take goes into it until you disable the Shared Library button. Our plan is to keep our photos separate until we go on a trip where we’re likely to want each other’s photos. When we got home, we simply opened the camera app and tapped the Shared Library button to toggle it off.
I have to say that having a Shared Library was positively liberating for me on vacation. Steve and I have a habit of taking the same photos of the same thing because we don’t want to have to ask the other person to send them to us. On this trip, I took far fewer photos with my iPhone because I could see Steve capturing what we were seeing. That allowed me to be more “in the moment” enjoying things than I normally am.
I did take artistic photos or worked with panoramas to try to capture the grandeur of the waterfalls, and I used my big-girl camera to get some fantastic close up photos of the penguins. Together we got complementary photos instead of duplicates.
Since we had good data connectivity in Argentina, our photos happily zoomed up to the cloud and back to each other’s copy of the Shared Library.
Every night I put my memory card from my big-girl camera into my Mac, and pulled the photos into our Shared Library. While in Argentina, the photos happily went up to the cloud and back down to our phones into the Shared Library.
But there was one huge problem. Remember I told you that Steve and I upgraded and enabled the Shared Library on our M1 Macs? Steve decided before we left that it would be prudent to bring his 2016 Intel MacBook Pro on the trip instead, just in case something happened to his backpack. This strategy saved him a few years ago when we went to Peru, and his backpack was stolen. He was very glad he’d been smart enough to carry his old laptop.
The problem with this strategy for this trip was that the 2016 MacBook Pro can’t be upgraded to macOS Ventura. Neither of us remembered this problem. The MacBook Pro on macOS Monterey received none of the photos we were taking.
He was so bummed! That meant that in order to use his Mac to write posts to friends and family, he had to connect his iPhone to his Mac using a lightning cable and import the images manually.
As it turned out, once we got on the ship, that was the only way either of us could do it because the Internet was so slow. I ran a ping test and the latency was comically bad from Antarctica.
In the Terminal, if you type ping www.apple.com it will tell you how long the data packets take to go from your computer to the server and back. From my house, this is normally around 20 ms to Apple, but it was taking more on the order of a full second! Not only that, it was dropping 3 of the 10 packets it sent.

To be fair, it was extraordinary that we were able to get even this satellite service being so far from the equator. Geosynchronous satellites sit at the equator, but they have a wobble to their path called inclination. This makes the path look like a wave going above and below the equator over 24 hours. Most geosynchronous satellites have a very small inclination (half of a degree), but that inclination isn’t big enough to be able to see around the curvature of the earth to Antarctica.
To hit the South Pole for example, only a few geosynchronous satellites have an inclination big enough (8.7°), and at that, it’s only for 4 hours per day! We were at around 65° south of the equator on the ship, so we had access for much of the day. (Read more at www.usap.gov/…
Rather than complain about 1 second ping times, we were delighted to have even this tiny pipe to get our messages back home. But it did hamper our whole photos strategy.
I did the same dance as Steve, importing my photos manually from my iPhone to my Mac on the ship. I also used my big-girl camera to get super cool closeups of penguins and imported them to the Mac as well.
I never figured out a batch method to move the big-girl photos from my Mac back to my iPhone so that I could show them off to other folks on the ship. I did AirDrop a few of the best of the best, but it seemed I should have been able to push the photos the other way.
I met a woman on the ship who had a better strategy that I’ll be deploying in the future. She bought an SD card adapter with a lightning connector for less than $20. She connects the SD card adapter to her iPhone, puts in her big-girl camera’s SD card, and the iPhone recognizes it and offers to import all new photos. If I’d done that, I could have then connected the iPhone to my Mac and pulled both iPhone and big-girl camera images into my Mac, and backed them up from there.
While I tried to be very rigorous with my process, I knew that manually importing photos while the Shared Library was still active would assuredly cause duplicates. I haven’t got my final count yet but as I’ve been cleaning up my photos since I’ve been home, it’s at least 500 duplicates. Oh well, I’d rather have duplicates than missing photos.
Backups
Speaking of backups…
When Steve and I traveled to Ecuador and Peru a few years ago, we employed a good backup strategy that saved us when Steve’s backpack got stolen. We carried two external SSDs, and daily backed up our photos from our phones, Steve’s camcorder and GoPro, and my big-girl camera. The smartest thing we did was swapped backup drives so I was carrying his, and he was carrying mine. In the airport in Cusco Peru, when Steve’s backpack was stolen, he lost not only his laptop, but also his camcorder, GoPro, and passport.
While it was a very sad day, imagine if we hadn’t swapped backup drives. All of his photos of the Galapagos and Machu Picchu would have been gone. Needless to say, we did the same thing on this trip. If you learn anything from this tech in travel post, consider following our lead and carry backup drives and swap them with one of your fellow travelers.
Sharing Photos
The ship we were on was pretty small, with only 150 passengers. That meant that after a few days, it was pretty easy to have collected quite a few new friends. When we’d get back from our excursions, we’d always talk about what we’d seen and invariably someone would say they’d gotten a great photo of someone else on the excursion. Immediately you’d hear, “AirDrop it to me!”
All day, every day they would be happily swapping photos around and it was amazing how well it worked. The sad part was that the Android people just sat there lonely and left out. I wonder how many people go through an experience like that and switch to iOS as a result. I felt sorry for them.
Apple recently changed the settings for AirDrop, which was something I needed to teach people on the trip. In order to receive something via AirDrop from someone you’ve just met, you need to set it to accept from Everyone. If you’re up to date on iOS, you can’t leave it set to Everyone any more, you can only change it to Everyone for 10 minutes. Leaving Everyone open was a surefire way to get photos you may not want to receive, so I think it’s a good change.
This also gave me an excuse to lecture my fellow passengers on keeping their phones up to date. If I was helping them and in the AirDrop settings it said, “Everyone” instead of “Everyone for 10 minutes”, I knew they weren’t keeping up to date. I’d point to the giant red number on their Settings app and tell them that task #1 when they got home was to run that update!
I thought I was quite clever to show them how to simply search for AirDrop within Settings rather than try to remember where Apple had buried it. But on the very last day of the trip (when we were in Iguazú Falls), one of the tour guides offered to send us a cool compilation photo of the falls in normal times, a drought year, and a flood year. He said that he would AirDrop it to all of us (again leaving out our Android brethren). He then explained a much easier way to change AirDrop settings!
Pull down in the upper right to reveal Control Center. Press and hold on the Airplane Mode icon in the upper left box that has all of the network connection options like WiFi and Bluetooth.

One of the options on the page that comes up will be AirDrop, where you can select between no one, contacts, and everyone for 10 minutes.
I was so excited to learn this new trick on how to change AirDrop settings I had to share it with you.
iCloud
On the ship, I realized that my Mac was trying desperately to sync photos to iCloud, which was never going to work, and it was jamming up the itty bitty Internets for us and everyone else on the ship. I had to take the drastic step of shutting off iCloud. If you’ve been listening to me for any length of time, you know that turning off iCloud is asking for pain and suffering when you have close to 100K photos.
When I got home, my Mac checked all 94,322 photos one by one until it was sure they were all synced properly. It used to take longer but this time it was only 3 days. During that 3 days, my Mac’s library didn’t receive any new photos and it gave me zero feedback. Annoying but I suffered through it.
When I shut off iCloud, I knew what I was getting myself into for on the Photos issue, but I forgot what else would happen. When I got back home and went to save some files to my NosillaCast folders, I noticed that all of my Documents were gone! I eventually discovered the archived copy it automatically created, but it wasn’t until I turned iCloud back on that the “real” iCloud folder came back. A bit scary there for a moment, and I had to remember to delete the archived copy when I turned iCloud Drive back on.
I also learned how much I depend on using the Continuity features of iOS with macOS. For example, I sometimes need to type something into my phone, but I’ll type on my Mac or iPad first, copy it, and then tap on my phone and hit paste. Logged out of iCloud I lost all continuity features too. It made me appreciate even more the convenience you get when you go all-in on Apple.
Messaging
One of the big weirdnesses on the trip was messaging. While my beloved Telegram worked flawlessly for sending images to groups of people of iOS and Android persuasion alike, the Messages app had lots of problems.
I knew I wouldn’t have my “real” phone number since I was using an eSim from another provider, so I made sure that the Messages app was set to send and receive from two of my email addresses. But here’s the weirdness.
- I could send a text-only message to anyone on iOS
- I could not send a message with an included photo to anyone on iOS
- I could not send a text-only message to a group of people who were on iOS
- I could not send any messages of any type to even a single person on Android

If anyone knows why that happened, I’m all ears. I’ve never seen it before.
On my beloved Telegram, I noticed something cool. While on the ship, if I uploaded an image to someone on Telegram, as you would expect, it would be super slow. But if I uploaded that exact same image to a second person or group, it would be super fast. I knew they stored your data in the cloud but it appears that they can recognize the same content and don’t upload it a second time.
Other folks on the ship were using WhatsApp to communicate with friends and family at home and it worked equally well for them. WhatsApp is owned by Meta, and I’ve sworn off all services from Meta including FaceBook and Instagram. I never liked the interface on WhatsApp anyway and only knew 3 people who used it so it wasn’t a big loss for me.
iPad Wasn’t Necessary
Over the years I’ve always traveled with my laptop and my 12.9″ iPad Pro. The Mac is essential because I write an email travelogue every day telling folks about our adventures. I’ve tried doing it on the iPad and it takes me about five times as long, especially trying to embed photos into the letters. It’s very hard to carve out the time on these trips to write as it is, so anything that makes it take longer is a non-starter.
I’ve always had huge laptops with a 15″ for six years and then two years with a 16″, so I bring the iPad along for everything but writing the travelogue. I use the iPad Pro to watch movies on the plane for example, because the battery life is so amazing. On our trips to Iceland and the eclipse trip in Chile, there was a lot of time on buses. Even though the final email had to be written on the Mac, I often brought the iPad along to work on a rough draft (without photos) and it was a big help.
But now that I have a 14″ MacBook Pro with amazing battery life, I didn’t find myself reaching for the iPad at all. The 14″ doesn’t weigh that much more than the 12.9″ iPad with the Magic Keyboard. I did watch a movie on it on the way there, but I could have just as easily watched it on my Mac. For the next big trip we take, I very well might not take my iPad Pro. Carrying both is really heavy so my back would thank me!
Magnetic Wallet
Last June I told you about a magnetic wallet that I got from Kimguard along with a case I bought from them (all for $20). It holds just two cards and sticks to your phone’s Magsafe connector. I kept it connected to my phone for a couple of weeks, but over time stopped using it regularly since I carry a purse. But on the ship, this was the perfect accessory. It held my magnetic key card for our cabin along with my phone when I toddled off to eat or drink. You can’t leave a cruise ship without scanning your room key and you have to scan when you get back on so they know they didn’t leave you with the penguins. Having the magnetic wallet for my key card was ideal and I’ll be bringing it on every trip from now on.
Tech Support for the Trip
One of the fun things about this trip was that I got to do tech support for my new friends.
On the very first day of our trip with the alumni group, while we were still in Buenos Aires at a hotel, a woman named Lynda walked up to our table and said, “Do you have an Apple Watch?” When we said yes, she plopped down at our table and said, “Why does my phone know the new time in Buenos Aires but my watch is stuck on the time in New Jersey?” Great question, Lynda!
We tried several easy things while chatting with her, including restarting the watch but we were unable to fix it. We ran out of time at breakfast, but the next day we were waiting for our lunch at the hotel restaurant and Steve saw Lynda out in the lobby. He dragged her to our table so we could work on it some more. She turned out to be hilariously entertaining, so it was really fun to work on this for her.
I’d like to take full credit for figuring it out but this one was definitely a team effort between Steve and me. It turned out that Lynda’s phone was not paired with her watch! The reason Lynda didn’t notice sooner that her watch wasn’t paired was because it was a cellular Apple Watch. While at home, it was happily using its own connection to receive email and text notifications and do all of the other things an Apple Watch can do.
But as soon as she left the US, her cellular connection was gone so the watch stopped getting any kind of updates, including accessing the time servers.
Lynda had given us a clue; she told us early on that she’d recently gotten a new phone. Evidently in the transaction with Apple, no one told her she’d need to pair the watch with the new phone. We scoured the Internet and discovered that in order to fix the problem, we’d have to wipe her watch to factory settings. She happily agreed to let us do that. After running the pairing process, it offered to download her watch configuration from an iCloud backup. Once we did that, she was 100% in business.
We basically became legends in our tech support skills. Ok, maybe not legends, but word definitely spread.
Our new friend Carol simply could not get Internet while on the ship. She was very disinclined to “bother” me, and when I’d suggest we work on it, she often didn’t have her phone with her so I could try to help. She was also very skilled at throwing in information to obfuscate the root cause. “It all started when they made me install a two-factor authentication app!”
Finally, on the last day on the ship, I got her to bring her phone to me. In order to connect to the ship’s Internet, at least once per day you had to navigate to wifi.ponant.com and enter a username and password that we were issued on the first day. They gave Steve and me two logins, so of course I had to go back and get at least 3 more.
I asked Carol if she’d gone to that web page on the day I was diagnosing the problem, and she said no, that she’d never been to that page and had no idea what I was talking about with this username and password login nonsense. 🤦♀️
We toddled over to the front desk, I arm-wrestled the recalcitrant woman behind the counter to give Carol a login. I entered the credentials and Carol was connected. She was beside herself with awe at my incredible technical skills and was happy to finally have Internet on the very last day of the cruise! I sure wish I’d been able to fix it for her sooner.
I’m going to change the name of the third person I helped because her situation revealed so many security issues. We will call her Martha. No offense to the lovely Marthas out there.
Martha could not get into email on the ship or send text messages, but she could browse the web. Since it was clearly not a connectivity problem, I was baffled at what could be the root cause. When we got back to Buenos Aires, she still couldn’t send messages or receive email.
She eventually mentioned that she had gotten some emails about a Google security alert. I reviewed the messages, and then looked in her Settings and there was a red alert on her account name in Settings. I dove in, and it was telling her that she needed to reauthenticate to her Google account.
I asked her if she knew her Google login, and she proudly pulled out a piece of paper with all of her important usernames and logins on it! I was suitably horrified. I was even more horrified when I scanned the list of passwords and saw the same pattern of four numbers in every single one of her passwords. Take a wild guess what her 4-digit code was to open her phone. Yep, the same 4 digits.
Even though she said she didn’t have any “important” passwords on that piece of paper, remember that password resets go to your email. So if someone had stolen her purse, she’d have lost her phone, lost her email password, and it wouldn’t take a rocket scientist to guess her 4-digit code to get into her phone to access said email. She could be owned in every sense of the word.
We had a short chat about 1Password, and I told her when she gets home I’ll help her get started. She’s not ready quite yet, but I’m not going to stop badgering her until I get her started with 1Password.
Once I found the right password to her email on her little piece of paper, I entered it into Settings on her iPhone and immediately all of her emails came flowing in.
20,000 mAh, 100W Powerbank
Back in 2019, I interviewed Eric Mathiesen from Omnicharge about their full range of power banks. Shortly after that, I bought one of their USB-C Power Delivery power banks and it is one of the most useful devices I travel with.
It sports 20,000 mAh of capacity and has two USB-C ports with power delivery and two USB-A ports. The newer model they have now supports 100W charging which means it can quickly charge a MacBook Pro. My 4-year-old model is only 65 W but it can still charge my laptop.

With modern Macs, having a spare battery around isn’t as important, but for travel with a bunch of peripherals, it’s super handy. I’ll explain why.
Steve and I made a rule ages ago that when we check into a hotel or a ship or stay at someone’s house, we will always keep the same side of the bed as we do at home. We made this rule not because we would feel weird swapping sides, but rather so that we wouldn’t fight over who got the side with a bedside table and reachable outlets.
When we arrived on the ship, Steve realized that while his side had a table, there were no outlets at all. I graciously loaned him my Omnicharge power bank, which gave him four outlets for his devices. It was overkill for his phone and his watch, but it allowed him to have them by his bedside where he wanted them at night, and then during the day he moved the power bank to the counter in the room to recharge it. He was delighted with this solution.
The other reason it was super useful on this trip was because the ship had European outlets when we thought it would have Argentinian outlets. We had a giant pile of Argentinian adapters, but only 2 European ones. Using the Omnicharge, he could charge his devices at night using no power outlet and no adapters at all. During the day while we were out and about, he could take up one of those precious adapters to charge the battery.
Note that this device can also be plugged in to charge with one USB-C port while using the other USB-C port to charge a laptop and the two USB-A to charge a phone and a watch. It can even do data transfer via USB to your laptop from your phone. We didn’t need it to do this but it’s good to know you can.
I’m toying with the idea of buying myself the new Omni 20C+ for $250 and giving Steve my old one so he would always have power when he needs it and I wouldn’t have to share!
Capuchin Monkeys
The funniest tech in travel story of the trip actually happened to our new friends Bob and Nancy-Ellen. Part of our trip was to Iguazú Falls, which is an amazing place. It’s the second-largest set of waterfalls in the world, right behind Victoria falls. There are 275 falls spanning 1.75 miles.

As we rode to the hotel, our tour guide told us that they have Capuchin monkeys in the area. She explained that these little monkeys are very clever, and know how to open the sliding glass doors to the balconies of the hotel rooms, so be sure to lock our doors. When we checked into the hotel, the person behind the counter repeated the exact same thing.
After our hike, we all went down to the massive infinity pool (50m x 25m!) to have a nice swim. We were hanging out with Nancy-Ellen and Bob when someone said, “Hey look – there are monkeys on one of the balconies!” We were all enjoying the spectacle when Nancy-Ellen said, “Bob, is that OUR balcony?” Followed by, “I’m not sure I locked the door when I came back in from admiring the view!”

Bob scampered up to the room only to find their minibar completely raided and monkeys all over the balcony eating Reese’s Peanut Butter Cups and other treats.
While you might be enjoying this story at Bob and Nancy-Ellen’s expense, you might also be wondering what the tech angle is to this story. On top of the Reese’s and other treats, one of the monkeys stole the spare battery for Bob’s Canon DSLR camera!

At first, the monkey dropped it and wandered off when they couldn’t figure out how to eat it, but then came back later and took it to parts unknown.
The joke is on the monkey though, it wasn’t a genuine Canon battery, it was a cheap knockoff from Amazon.
NosillaCast in Antarctica
If you comb the archives of podfeet.com, you’ll find that as far back as 2006 I started trolling the audience to try to get someone to listen to the NosillaCast from Antarctica. Back then I used to regularly review the list of countries from which someone had accessed the site, and I had 93 countries by then, but no one had ever come from Antarctica. I know Antarctica isn’t a country, Tom.
In 2008, someone named Michael wrote in a comment that he was planning a trip to Antarctica and said he was going to make sure to get a photo of him with his iPod and the show art from the continent. But to my memory, I never heard from him after the trip.
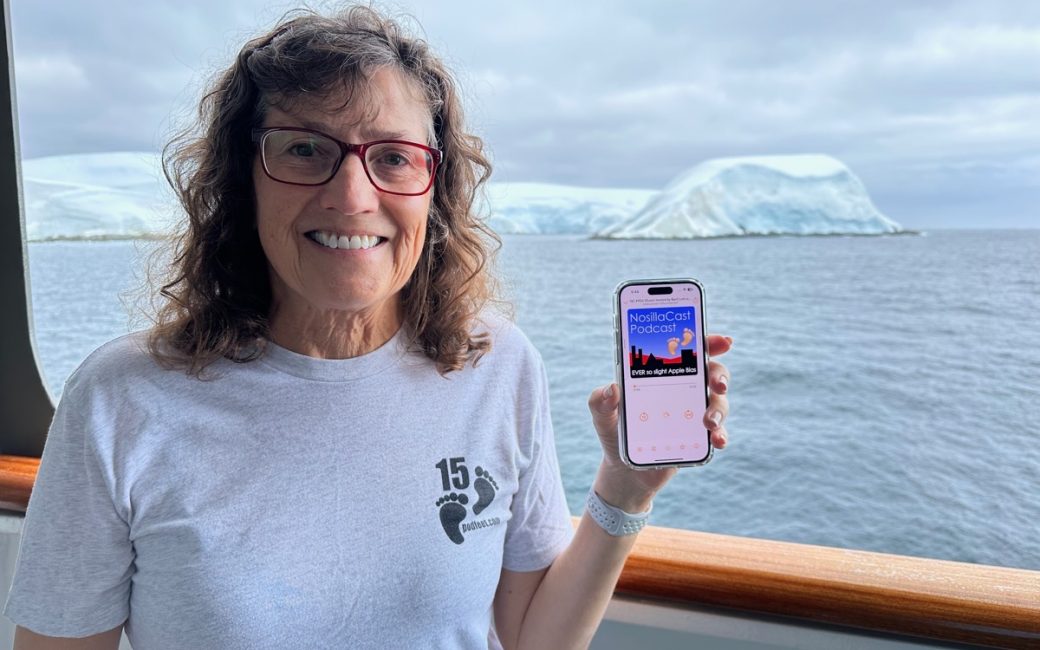
You know the old adage, if you want something done right, sometimes you just have to do it yourself. I’ve included a photo in the show notes of me wearing my Podfeet t-shirt, holding up my iPhone playing the NosillaCast on the ship with the coast of Antarctica in the background.

Bottom Line
The bottom line is that on every big trip, I learn new things about how to use the tech on vacation that we take for granted when at home. I learned not to leave camera batteries out with monkeys around. We learned not to bring an old Mac on trips. I debated whether to take my big-girl camera along to Antarctica, but even with the faffing about with importing photos, I got some absolutely terrific photos of penguins that I would never have gotten without it. While the iPad Pro probably won’t make the next big trip, I think I’ll still carry my big-girl camera.
I hope you enjoyed learning about what worked and what didn’t on our grand adventure to Antarctica.