 When last we left our heroes Allison and Steve, we were trying to set up a second Drobo. If you didn’t hear last week’s show, the problem to solve was that we wanted a new Drobo and to use our old Drobo to back up the new one. We made a slight error by putting the old drives in the new Drobo just to test the speed, which reconfigured them so they couldn’t go back into the old Drobo without erasing them. We were partway through the process of copying all of the data over our network to a 3TB USB drive as a holding place till we put the new drives in the new Drobo and put the data back. With me I hope?
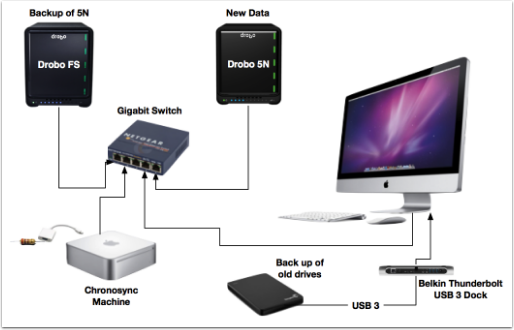
Copying the data from the new Drobo with the old drives over to the USB drive spanned about 5 days, but we weren’t feeding it data that entire time. Remember we were using a USB 3 drive but Steve’s iMac only has USB 2. While it was copying, we bought a Belkin Thunderbolt Dock from Amazon. This dock plugs into one of the iMac’s 2 Thunderbolt ports, and gives him 3 USB 3.0 ports, 2 Thunderbolt ports (so he actually gains one) plus gigabit Ethernet and FireWire 800. By the way, it was $159 new on Amazon, but we noticed they had them used for $125 so we went that route.
After the data was all on the backup drive, Steve used the Belkin dock to connect it over USB 3 this time to transfer it back to the new Drobo with the new drives. The process of sending the data back, instead of taking 5 days, took 2 days. That’s not a super scientific measurement so Steve used the free BlackMagic Speedtest app to measure read and write speeds to the USB drive. On USB 2, he was getting 38MB/sec and 31MB/sec read/write, and on USB 3, the same drive gave him 78 and 71 respectively, so almost exactly twice as fast.
I heard about this Belkin dock from Dave Hamilton on the Mac Geek Gab. It’s a great way to improve the speed on your computer even if it’s as new as Steve’s iMac. Dave originally looked into it because his Ethernet jack on his iMac had started giving him 100mb/s speeds instead of gigabit and this was a way for him to get that high speed port back without tossing out an otherwise perfectly good Mac.
If you recall the original purpose of the new Drobo was to get the increased speed of the 5N over the other FS. When he bought the 5N, remember he also bought the mSATA SSD which was supposed to accelerate data access even more. So while Steve was working with all these combinations, he did several more speed tests to validate that we achieved our objectives.
When we started this whole adventure, we were using the Drobos over wifi, and only later when we did the math on how long things were going to take did we drag an Ethernet cable down the hall to do the heavy lifting. I know we should have thought of this at first but it’s pretty impractical under normal circumstances. But these were NOT normal circumstances, so the house is a deathtrap of cables up an down the halls now.
I put a bar graph in the shownotes of all of Steve’s speed tests, but I’ll run through it now for you. to simplify things I’m going to average the read/write speeds but the graph shows all of the data.

Our original configuration was the old Drobo FS with the old drives, and over wifi we were averaging 184mbps. When Steve put the old drives in the new 5N, still over wifi, oddly the speeds dropped a smidge, down to 144mbps. We have no explanation for that. When he put the new drives into the new 5N, we went up to 224mbps.
We got more speed improvement going to gigabit Ethernet (I’m sure you’re shocked) where the old Drobo with the old drives went up to 292mbps. The old drives in the new Drobo did much better over Ethernet (again no explanation for why they slowed down over wifi in repeated tests) but over Ethernet the new Drobo with old drives jumped up to 448mbps. Finally the new Drobo 5N with the new drives shot up to 716mbps! If we can get Steve gigabit Ethernet in his office, he will nearly be able to fill that pipe with Drobo read/write goodness!
And yes, I’m looking into getting him one of those Powerline adapters. I’ve found some that claim to be gigabit, so stay tuned to see how that works out.
Backing Up Drobo to Drobo
 Now you realize we still have the last piece of the adventure to cover – we have to figure out how to back up up the new Drobo to the old Drobo so we can justify owning two of them, right? I’m a fan of SuperDuper! for my backups but to be honest Shirt Pocket Software is one of the least responsive and helpful companies around. I popped open SuperDuper! and it couldn’t see my mounted Drobo shares, and I couldn’t find anything in the documentation to help me. They did say that you can’t back up to a network attached storage drive unless you create a sparse disk image there first, which sounded like a lot of irritation to me.
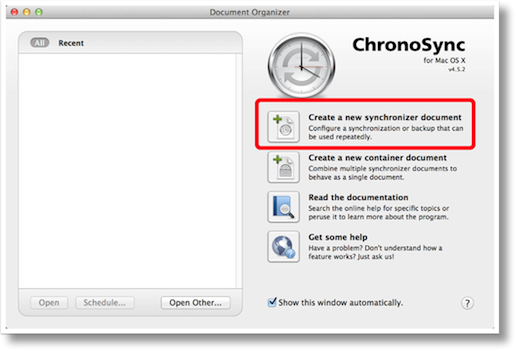
I checked in with Don McAllister because I knew he backs up a Drobo to a Drobo and he said he uses Chronosync. I’d been wanting to play with it for a while so I headed on over to Econ Technologies. Before I get too far into this, I have to say the customer support is a breath of fresh air at Econ compared to Shirt Pocket. Jennifer and I are on a first name basis after all my questions and her great answers.
They have a demo version that’s very capable, which was awesome. You can do a sync between two volumes to get the hang of how it works and sync up to 500 items. You can test out their scheduled syncing operation (which will be important in a moment). You can only run one test and then you have to quit and reopen the software. This is just annoying enough to make you want to pay for it but not so annoying that you can’t figure out whether it works for you. If you really need to do more extensive testing, they have a limited time trial that’s a full version.
The reason I ended up bothering Jennifer was because I was looking for guidance on why I’d want to buy the full individual license of Chronosync directly from the website, vs. buying Chronosync Express from the Mac App Store. I really wanted the answer to be to buy from the Mac App Store so that both Steve and I could play with Chronosync Express, and it was cheaper at $30. If I bought it directly through the website, it’s $40 so it would be $80 for us each to have a license. Jennifer explained that one big difference is that the full version is able to wake up a machine on the network to perform the syncing operation. That sounded really cool and like something we’d want to do, but that meant it would be more appropriate on Steve’s iMac rather than my MacBook Pro.
But I didn’t want him to get all the fun of setting up the backups, and to be honest, in the past he has shown a tendency to shut off backups because the disk access sound bothers him, or he feels like it’s slowing his machine down. He’s been very good lately, but I didn’t want to trust him to keep this going (and again, I wanted to be the one to play with it).
Hacking the Mac Mini
 As is the habit of my species, I decided to discuss this with my girlfriend Dorothy. She knows how it is not wanting to share tech with her husband. She had an AWESOME idea. She suggested instead of Steve or my Mac, why not use the Mac Mini we have hooked up to the TV that hardly ever has anything to do? It was brilliant because either or both of us can screen share to it . I ran a bunch of test runs on the Mac Mini and it worked great. The interface was intuitive and easy to learn. Bascially you drag the source disk into the left pane, the destination disk into the right pane, and the big arrow in the middle shows you the direction the data will be synchronized. You have a couple of other little decisions like whether to sync deletions or not (we’re choosing to say yes to that). You can sync right there with a push of a button and you can set up a schedule for when you want the syncs to happen (2 am for us!)
It was so easy using screensharing. I clicked on the Mac Mini under Shared in my left sidebar of a Finder window and then clicked on Screensharing and boom, I’m into the Mac Mini in a floating window. I made it full screen so I could use a four-fingered swipe on my track pad to flip over to it to see how it was progressing throughout the process. So much fun!
I loved it, I bought it and started some syncing. The first couple went really well until I got to Steve’s share called “Large Video”. I don’t mean to imply that it went badly but after 3 days only about 300GB had been synced, and we have a total of almost 3TB to move, remember? You know why this is, right? It’s because the Mac Mini is on wifi! There’s no way I could get an Ethernet cable down the stairs and around the corner, so I figured I’d just disconnect it from the TV and receiver and bring it upstairs by the gigabit switch.
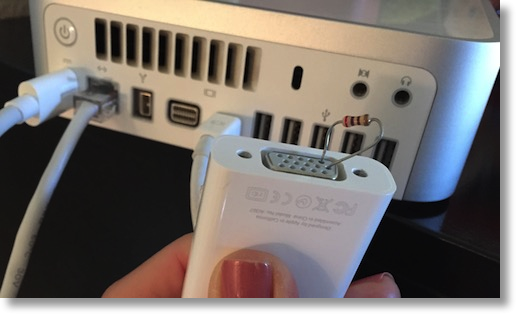
And that turned into another adventure, but a fun one. The Mac Mini is now headless because it no longer has the TV connected as a monitor. When I went into screensharing on it, the window was really really tiny on screen and my mouse was moving REALLY slowly. I went into Display prefs on the Mac Mini and changed the resolution and the whole screen went black and never came back. I rebooted, and we’re back to the dopey low resolution and slow mouse.
Off to the Googles and a search for Mac Mini headless resolution found the answer. Turns out that if a Mac Mini doesn’t see a monitor, it doesn’t bother loading those silly little graphics drivers! Without graphics drivers, you can’t set the display and the mouse will be all goopy. Luckily I found this out at MacMiniColo Blog where the unnamed author explained that you can make a dummy dongle for the Mac Mini. The idea is that if you can convince the Mac Mini that there’s a monitor connected then it will load the graphics drivers you need. He/she explained that you can take a Display Port to VGA adapter, plug it into the Mac Mini, and put a resistor across pins 1 and 6 on the VGA side and the Mac Mini will be appropriately fooled. Now this sounded like my kind of fun.
The good news is that I have a pile of those kind of adapters, but sadly Steve, who claims to be an electrical engineer, has no resistors in the house. Not to worry, our buddy Ron is sure to have some. I remember when our kids were little, one of them told me they thought that Ron’s study smelled just like Radio Shack! That’s the kind of geek friends you love to have! So I called Ron and he said of course he has some, but he was in Florida. I explained to him that in a weak moment he’d given us a key to his house, and he agreed that it wouldn’t be too creepy if I broke into his garage to steal resistors He said it was ok as long as I didn’t hurt his Tesla that was happily stowed in his garage.
 He cautioned me that he hadn’t ever sorted them so it would be a hodgepodge to find one of the right value, and that I’d probably want to bring a multi-meter to measure them unless I wanted to spend a lot of time learning the codes of the painted stripes on the resistors. I told him that neither would be necessary. Remember during Macworld this year, Kirschen Seah interviewed the developer of Resistorvision for the NosillaCast? I jumped into the App Store, paid my $2 for Resistorvision and took a walk to Ron’s house.
The author who suggested faking the dongle said they’d used an 85ohm resistor and gave no guidance on whether that value was important. Ron said anything from 100 to 500 would probably be fine. You don’t want to short the thing out with too low of a value but too high and it wouldn’t work either. When I got into his garage and started scanning with Resistorvision I was finding many with super high values, in the kilo and megohm ranges, so I gave Ron another call. He helped me figure out what to do, but while were chatting he said, “hey let me try something” and suddenly the horn honked on the car! About knocked me over because my head was right next to the left front. Pretty cool that he could do that though. Then he demonstrated how he could unlock the car, and sure enough the door handles silently slid out as it unlocked. I tried to get him to start it for me, but he’s smarter than that.
Anyway, back to our story. I got back home and built my little Frankenstein dongle with one of the lower resistors (I think I used 290ohms) and sure enough, the Mac Mini will now let me set it to 1600×1200, which will work fine for my needs.
I think this will bring a close to Steve and my long adventure with the Drobos and how much fun we had setting them up. I expect the fun to die down and the dumb things will probably just work from now on.
As I was figuring out how to get Chronosync working on the two Drobos and the Mac Mini, I decided to document along the way in Clarify. It’s not my usual in depth bit by bit tutorial but I thought it might be useful to some folks so I went ahead and posted it under Mac Tutorials on podfeet.com.
https://www.podfeet.com/blog/tutorials-5/back-up-drobo-to-drobo/
[…] Backing up a Drobo – The Adventure Continues […]