 Chris Ashley and his minions from the SMR Podcast are a bad influence on me. Their excitement about Windows 10 got me wanting to try it too. I’m a member of their Facebook group and they encouraged me to give it a try and explained that you actually can run it for free even if you don’t have a previous license through the Microsoft Insiders Program.
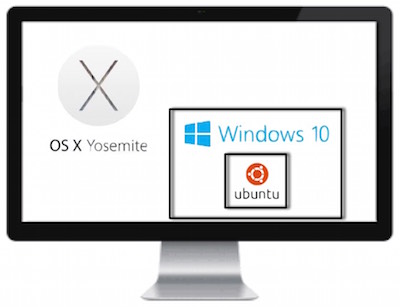
Of course I wasn’t going to buy a Windows 10 Machine, and I’ve never really liked the idea of dual booting a Mac with Boot Camp so I decided to do it by creating a virtual machine inside my Mac. If you haven’t ever played with virtual machines, it’s a way of installing an operating system in parallel with your main operating system so you can switch back and forth between them real time. I started by downloading Virtual Box from Oracle, the open source virtual machine software. In my scenario, OS X would be my host operating system and Windows 10 would be the guest operating system. To install an OS inside a virtual machine application like Virtual Box, you either need a real CD or you can download the guest OS as an ISO file, which is essentially a disk image of a CD. I downloaded Windows 10 from Microsoft and I was ready to go, but I made a few mistakes along the way.
When you create a virtual machine, you have to allow it to use some of the RAM and Disk of your real machine. If you have only 4GB of real RAM, you wouldn’t want to give the guest OS 4GB or your host operating system, OS X in this case, wouldn’t have any left for it to run. You also have to allocate a certain amount of disk space to give the guest OS some room to run and install applications. You’d think with a 1TB internal disk on my MacBook Pro I’d have gobs of free space, but because of all my photos and doodling around with other stuff, I’m constantly looking for ways to save space. The good news is these days virtual machine applications allow you to specify an upper limit of how much disk to take up but it will only expand to that size if it really needs it.
When I ran through the installation of Windows 10 inside Virtual Box the first time, I really goofed up on the disk space. I forget what it recommended, but I didn’t want to give it that much so I decided to see what it could do with only 4GB of disk. Not only did I disobey the recommendation, I didn’t realize that the field was expecting MB not GB, so I actually only gave it 4MB. So yeah, that didn’t work so well. I couldn’t figure out how to increase the disk allocation size so I just deleted the virtual machine and started over again.
This time I gave the virtual machine 8GB of disk which I figured would be enough even though they recommended more. I was able to install Windows 10 just fine and up it came. Very exciting! But when I tried to install Skype, I got a warning that I actually had NEGATIVE disk space! Oops. At this point I could have just deleted the virtual machine again and installed for a third time, and it would have taken maybe 10 minutes if I round up. So of course that’s not what I did, I went on a hunt for a way to increase the disk space inside the virtual machine software. I mentioned this to Steve and he just shook his head at me.
And that’s when things got super geeky and fun. I found a video online explaining how to do increase the size of a virtual machine and started to follow along. The first step is to simply increase the size of the file that is the virtual disk, designated by the extension .vdi (I’m guessing it stands for virtual disk image). That’s done though the command line and of course since I’m super comfortable in the Terminal, having pretty much tamed it and all, I followed the instructions without any problems, increasing the size of the disk to 30GB.
VBoxManage modifyhd absolute_path_to_file --resize size_in_MB
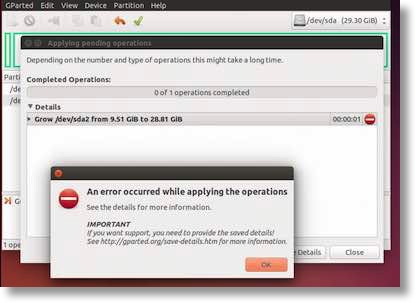
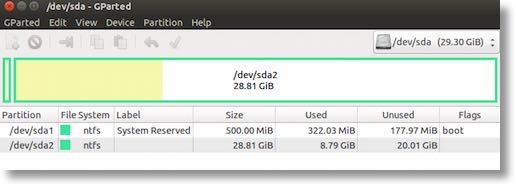
 But wait, there’s more. At this point we’ve effectively got a 30 GB disk with an 8GB partition inside of that disk, so we have to repartition it so that Windows can take advantage of the entire thing. The tutorial I found used an open source tool called GParted to do the repartitioning so that Windows can take advantage of the whole thing. GParted comes with the Linux operating system called Ubuntu, but we’re not running Ubuntu, we’re running Windows. GParted is available by itself too but it only runs under Linux. So now things are getting interesting.
Linux distributions (called distros by the cool kids) are often available in what’s called a Live CD. If you make a Live CD, you can throw that into your computer, boot from it and use Linux without ever installing it. It’s a pretty cool way to experiment with a new operating system to see if you like it. You can download an ISO file that is a “Live CD”, and I put that in quotes because of course we’re not using any physical media here.
I suppose I could have mounted the Live CD ISO of Ubuntu under OS X and then repartitioned the Windows Virtual Disk Image file, but what kind of challenge would that be? I decided to try to open a hole in the space-time continuum instead. I launched Virtual Box, started up the Windows 10 virtual machine and from in there I mounted the Live CD of Ubuntu. Then I had to tell the virtual machine to reboot but boot from the virtual CD disk image. That means I was running Linux inside of Windows inside of OS X. It was awesome.
 I posted a screenshot on Facebook of my feat and as I hoped, Knightwise, king of the online sliders community wrote, “SO …. PROUD .. RIGHT NOW … *Tears up …”
It turns out to be a good thing that he was paying attention because when I ran GParted inside Linux inside Windows 10 inside OS X, I got an error message. I know, shocking, right? I posted it back to Knightwise and he noticed that buried in the error message it said “NTFS is inconsistent. Run chkdsk /f and reboot twice”. He said this was a sign that somehow the Windows 10 disk structure was messed up (it’s inexPLICable how that happened) and these instructions were to be run over on the Windows side as “chkdsk c: /f”.
I ran that from the command line in Windows 10, rebooted to the live CD of Ubuntu, ran GParted without failure this time, dragged the repartioning slider so the vdi was now a full 30GB, rebooted back to Windows 10 within the virtual machine and Bob’s your uncle I was back in business with Windows 10!
I have to confess that I spent so much time goofing around with this that I haven’t had much time to play with Windows 10 yet, other than to install Skype so I could say hi to the SMR Podcast Minions. I did tweet out what I’d done and got a huge kick out of the responses: Sam Powell & Tom Dixon said I made their heads dizzy, Rob Workman said I made my very own virtual Matryoshka doll, and several people including Martijn suggested I had fallen into the movie Inception. My favorite response was about Steve not understanding why I would go through this much trouble. David Roth posted an awesome clip from Big Bang Theory that totally explains why I did this.
Using a Screen Reader? click here
Hi Allison
I have Windows 8.1 on my mid 2011 iMac running under Bootcamp and it runs very well but is truly horrible to use. Purchasing a version to install on virgin machine, that was not an upgrade, was nearly impossible even with my son-in-law who works for Microsoft trying to help.
According to the Apple site my iMac does not get an upgrade to Bootcamp to run Windows 10 so I was going to try it on my MacBook Pro but don’t want to pay another AU$179.00 for very occasional use.
I signed up to the Microsoft Insiders Program and I could use your advice on how to access it for free.
Start here Trevor: https://insider.windows.com/Home/Index