 I’ve told you a lot of stories about how my friend Dorothy (aka macLurker) helps me out by writing scripts for me to help automate things I do for the podcast. She’s really smart and knows SO much more than I do about programming. We have a lot of fun working on these projects but let’s be honest, the brains have all been on Dorothy’s side of the keyboard. At best I could say I’m the idea person.
But those tables were turned for the first time this week. Let me set the stage with the problem to be solved before I tell you how brilliant I was.
Dorothy and her husband Marc go on long trips on their boat, and they need entertainment while they travel. They used to drag along giant piles of DVDs, but a while back they decided to rip their vast collection of movies and get an Apple TV to play them on the boat. Dorothy wrote a script to pull down all the metadata to get all of the movies to look right and show up correctly in iTunes for the Apple TV. Everything was grand.
They liked the Apple TV experience so much they decided to buy one for home. I tried to convince Dorothy to buy my old Apple TV when the new Apple TV came out but she didn’t fall for it and bought a new one of her own. You’d think this would be a happy ending, but something odd happened. A large percentage of their movies that played just fine on the old generation 3 Apple TV wouldn’t run on the new generation 4 Apple TV.
You know how when you recommend something to someone, if anything goes wrong with that thing it’s your fault? Well Dorothy and Marc had us over for a barbecue and Marc cornered me to tell me just what he thought of this new AppleTV. He was not pleased. He explained to me and I was able to verify that lots of people are having the same problem as Dorothy and Marc.
I decided that maybe I could help here. It was clear that something must be different in how these movies were encoded, and it was something that the new Apple TV couldn’t tolerate. Dorothy and I studied the specs for the two devices and didn’t find a root cause. It was time for a Dorothy and Allison play date.
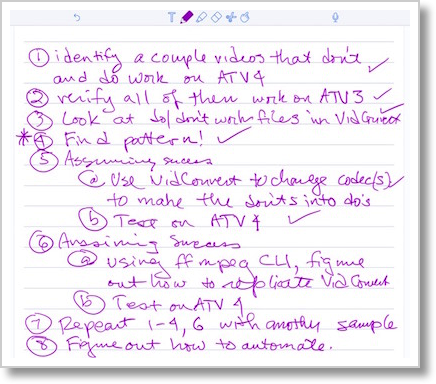
I went to Dorothy’s house and brought my iPad Pro, my MacBook and my MacBook Pro, and we used all of them! We used the iPad Pro for note taking (with the Apple Pencil and the awesome program Notability), Sure I could have used a pad of paper and a real pencil but what fun would that have been? Marc had taken their Macbook Pro on a trip, so I brought my two laptops so we could both experiment sitting in the living room instead of her having to run back and forth to her iMac.
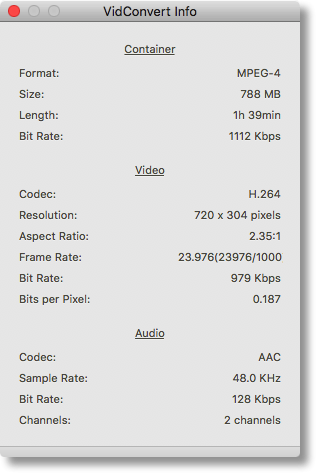
 I drew out a plan of attack. First we had to figure out what was different about those files that didn’t work from those that did. We went through the movies till we found 3 that worked and 3 that didn’t. Next we used a great tool I’ve mentioned before called VidConvert from ReggieAshworth.com that is designed to transcode video files, but It will also reveal everything about the innards of a video file.
Before I get too deep into this I want to tell a whole ‘nother story that will explain why I actually knew what I was doing in the next steps.
Side Story for Context
About a hundred years ago when I was working, I thought maybe podcasts inside our company would be a good way to communicate. I was running a large organization of computer scientists and engineers, so I assigned a couple of them to help me with this project. Pretty much the classic manager pet project. By the way, one of those computer scientists listens to this show (hi Keith!) Anyway, they created a web-based tool that allowed people to submit any format audio file and make it into an audio podcast. Not only did they have to transcode the audio file to an mp3, they also had to attach a company-sponsored audio disclaimer at the front end of every audio file saying “don’t share these podcasts blah blah blah” but that was pretty easy. The acronym for our podcast network was RPN by the way, homage intended.
Some time later, we got reorganized and I was no longer the manager, but I became an IT Fellow (which is a pretty awesome title, by the way, it means “smart guy”). I got the itch to improve the podcast network to allow video podcasting. I went back to the guys who’d created the original tool and asked them to help me figure it out.
Video podcasts were going to be much harder to produce. First of all the number of potential formats the users could submit was vast. I didn’t want to tell them they HAD to use a certain format because any friction at all would stop them from experimenting with this new medium. So we could get QuickTime movie files, mp4s, m4vs, or worse yet, we’d probably nasty old Windows wmv files! We wouldn’t know what size they were, 640×480, 1024×768, the options were endless on that too. To make matters even more interesting, we were going to have to tack that disclaimer onto the front of whatever glop they submitted. This was going to be an “interesting” problem to solve.
When I asked them if they’d figure it out, one of the guys (not Keith) said, quite cheekily, “YOU go figure it out.” I have to say it’s a bit of a shock when a manager has to stand on her own feet all of a sudden, but I decided to take on this challenge. So let’s review my skill set. I’m a Mac user who has been a manager for around 20 years, and before that I was a mechanical engineer, with my last programming class being Fortran IV with WAT5 in 1978 and I was going to have to figure this out using the command line in linux. Seriously.
It took me around four months to figure it out, but I did it. Turns out the key to all of this video nonsense is understanding two things, codecs and FFmpeg. I’ll come back to FFmpeg in a minute.
Codecs
You’ve heard people refer to a file as an mp4 or an mov, in fact I just did a minute ago. These are what’s called containers. They don’t define much of anything about the file at all. Inside a container is a video codec and an audio codec. Codec stands for coder/decoder. An example of an audio codec would be mp3 or AAC, while a video codec example could be H.264. With me so far?
Inside codecs though, that’s where you get to the juicy bits. You find fun things like the frame rate, bit rate, sample rate, key frames, and more. Think of this as breaking down atoms; you have parameters that are inside codecs that are inside containers. That’s why two mp4s sitting side by side are not necessarily the same kind of thing. One could have an mp3 audio codec and the other could be AAC, you simply don’t know from the container name. People often say things like “why does this m4v file play but this other m4v doesn’t?” Well now you know that the container name is pretty much useless information.
By the way when I was really dug into this stuff, nobody would talk to me at parties.
FFmpeg
 Anyway … how do you figure out what’s inside these files? You use an open source (free) command line tool and associated libraries called FFmpeg for Linux, Mac, and Windows. FFmpeg is super powerful. You can use it to query files, transcode them, and mash them together like I wanted to in my example from work. Here’s another fun factlet. Every single video encoding application I’ve ever seen uses FFmpeg under the hood. Whenever I find a new one I check and somewhere buried in the documentation there’ll be a reference to FFmpeg.
Back to Dorothy
Ok, enough with the lessons, let’s get back to Dorothy’s problem. We used Reggie’s VidConvert to query the files because it has a nice GUI. We’ll hold off on FFmpeg for now until we need to bring out the scripting tools. We made a little table in a Google Sheet with the fields I thought were most likely to be suspicious. For each of our 6 test videos, we recorded the container format, the overall bit rate, the video codec, the video bit rate, bits per pixel (whatever that is, hadn’t seen that one before), and then for audio we also recorded the codec, sample rate and bit rate.
 Out of all that data, we discovered that every video that did not play on the new Apple TV had a very odd audio bit rate of exactly 177 kbps. The ones that did play nice were all at the standard rates of 192 kbps and 96 kbps. We didn’t want to get too excited, but with anticipation we used VidConvert’s advanced settings to re-encode one of them by just changing the audio bit rate to 96 kbps. One super cool feature of VidConvert is that you can ask it to make you a preview so you don’t have to wait for a 2 hour movie to transcode. We made the preview and it worked on the new Apple TV!
Huzzah! There was geek dancing in the street. We know the problem and we know how to fix one, but we don’t want to use a GUI to fix all the offending videos. Remember that our goal is to write a program that will crawl Dorothy’s vast library and fix all of the 100’s of offending videos, so we can’t be using a sissy GUI, no matter how awesome Reggie’s tool is. It’s time to figure out how to do this with FFmpeg from the command line.
After just a few minutes looking at the documentation and googling for examples, we wrote the following command:
ffmpeg -i input.mp4 -b:a 64k -strict -2 output.mp4
This command says with the -i modifier, to take as input the file input.mp4 and with -b:a change JUST the audio stream to 64 kbps. Not sure why -b:a means the audio stream but roll with us here. AAC is the audio codec we want to use to stay consistent with our videos but the AAC encoder is an incompatible license with the GNU Public License (GPL) under which FFmpeg is distributed. You could download and build in the real AAC encoder but we’re trying to keep moving here. We added the -strict -2 line in order to use an experimental AAC encoder instead that does have a compatible license. Then all of this gets shoved into the output file output.mp4.
Believe it or not, for an FFmpeg command, this is a really simple one. I’ve made ones before that word wrapped several times! Anyway, the good news is that Dorothy ran this command on a real 2 hour movie that would not run on the new Apple TV, and after about 20 minutes she had a file with an audio bit rate of 64 kbps and it ran just fine on the new Apple TV. We have success on stage 2! We know what’s wrong and we know how to fix it from the command line.
Next we had to figure out how to query a file for its audio bit rate instead of using the visual tools within Vidconvert since this will be part of a script in the end. I discovered that with our FFmpeg download we also got a tool called ffprobe, which is designed to, well, probe the files. After some googling, I figured out how to get it to query a file and tell us the audio bit rate, but it returned a giant pile of glop with it. I actually used egrep to do this all by myself thanks to Taming the Terminal with Bart. Can you imagine how proud I was of my little self? Dorothy took off from there and figured out how to get it to return JUST the audio bit rate so that completes another phase of our project.
There’s a lot more work for Dorothy to do here. She needs to create a script that will crawl her vast iTunes library structure, use ffprobe to find every video that has the incorrect audio bit rate, and then run our FFmpeg command to change it to a more normal bit rate. This will keep Dorothy out of the bars for weeks.
Dorothy confessed at the end that she didn’t really believe that we’d be able to succeed at this task. She figured that either every video would be encoded exactly the same so we’d have no pattern to find or every video would be encoded completely differently so we wouldn’t find a pattern. She was delighted that we were able to find the clue so quickly.
She also explained that when I sent her the information to read on FFmpeg she was overwhelmed by all of the options and didn’t know where to start. I have to say the best part of all this for me was that for once I was the smart person helping Dorothy fix a problem. So far our score is about 268:1 in Dorothy’s favor but it was a victory nonetheless.
If you want to learn more about FFmpeg, check it out at ffmpeg.org/….

“Not sure why -b:a means the audio stream”
Near as I can tell from the documentation (http://ffmpeg.org/ffmpeg.html),
-b:means “bit rate” and I’m guessing theaflag is for “audio”– hopefully not too cheeky of me.
well that would make sense, wouldn’t it? Thanks Caleb! What was odd was instead of saying
-ba, they specifically said that was deprecated so to use-b:a.Glad to help! 🙂
It looks like the developers realized the commands could be more clear if there was just one flag for “bit rate” and then the user would define which bit rate they wanted to change. This would allow for greater clarity in the chaining multiple files and bitrates and would make it easier to visually determine if it is the video or audio bit rate is being affected.