 Have you ever had a favorite piece of software be abandoned by the developer? I’m not even talking about Apple or Google here, but maybe some nifty little utility that does exactly what you want. For years I have been adding a pretty little drop shadow to all images I post on the blog with a utility called Drop Shadow from Del Sol Software. As Tim Verpoorten used to say, “it does one thing and does it well.”
Del Sol’s Drop Shadow app let you change the angle and size and blur of the shadow and even add a little border to the image as well. The border was handy when I had a screenshot with a white background, otherwise it would wash out on the top and left against my white blog post.
A few weeks ago I thought to write to the developer to ask for an enhancement. I wanted a way to save the parameters of my drop shadows. It’s not hard to drag the little sliders, but I have to do it every time I edit an image. To my surprise, Del Sol Software is nowhere to be found. I searched on the web, on Twitter, Facebook, Google Plus and even LinkedIn, but it has vanished. Oddly you can still buy Drop Shadow from the Mac App Store so someone must be cashing the checks, but there’s no way to get updates ever again.
When software is abandoned, you can take one of two paths. You can keep using it and just hope each time a new OS comes out it will still work. Then when it stops working you can hold off on the update, or try to find hacks to keep it working (I’m looking at you, George.)
I choose a different path. As soon as I know something is abandoned, I find an alternative. I don’t want to be held hostage by an app. It was time to find an alternative for my beloved Drop Shadow.
I searched and searched and searched and couldn’t find an app that would do this one simple thing. Finally I came across an open source, command-line tool called ImageMagick from imagemagick.org/…. If you’ve been following along with our home game for more than 8 years, you might remember Bart told us about ImageMagick in April of 2008. He explained that he had written scripts to run it to put borders and his watermark on his images.
Now way back in 2008, the idea of opening the Terminal to talk to an image editor at the command line was so far beyond my capabilities it wasn’t even funny. To really take advantage of ImageMagick, you’d want to write scripts that talk to the command line. Again, scripting? Allison? Not even possible.
But now that we’ve been through Taming the Terminal and Programming by Stealth, this is no longer outside of my reach. Maybe I’m not a ninja in either one, but I’m not afraid of them now. I know that given enough time, and some help from my friends, I can use these tools to make my computer do my bidding! I decided to give it a whirl on my own.
The first thing I had to figure out was how to install ImageMagick. They have an install process with lots of steps in it, but they also say that if you prefer, you can just use the package manager Homebrew to do the installation. Normally I would have run away right then and there. However, just last week I told you how I installed Homebrew in order to use iperf to test my network. Seriously, it’s one line to install Homebrew (http://brew.sh) and then one more line to install ImageMagick. Seriously, the command is:
brew install imagemagick
About the only hard part of it is remembering that ImageMagick ends in a “k”.
Ok, we’re cookin’ with gas now. I’ve got ImageMagick installed but how do I use it? I have to say that the instructions on how to use ImageMagick to manipulate images are really arcane. At imagemagick.org you can find a reasonable list of things it can do, but if you follow the links you’ll be taken to a GIANT list of options. In that giant list I found the instructions on how to do a drop shadow, which were pretty unintelligible:
-shadow percent-opacity{xsigma}{+-}x{+-}y{%}
I didn’t even know how to make that command go. I’ve learned one very important thing watching and listening to Bart and my friend Dorothy, and it’s that they look almost everything up. They don’t have this massive store of syntax filling up their brains, but they know how to search. I can tell I’m falling into Bart’s madness, because I’m starting to find the answers to many of my questions at stack overflow, which is a site for programmers to ask questions.
I eventually found someone who’d written out the exact method to create a drop shadow in ImageMagick, but with a white border around it:
convert input.jpeg -bordercolor white -border 13 \( +clone -background black -shadow 80x3+2+2 \) +swap -background white -layers merge +repage output.jpg
I experimented by removing the stuff that looked like it was border related, and then started messing with the numbers. I like an 8 pixel shadow on the right and bottom (at least that’s what I used with Drop Shadow), so I ended up with this command:
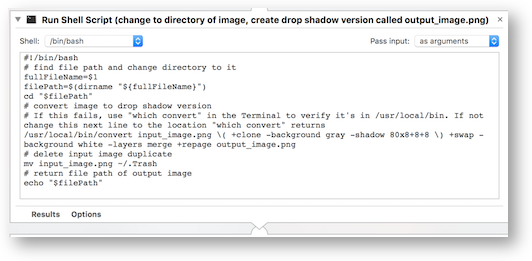
convert input_image.png \( +clone -background gray -shadow 80x8+8+8 \) +swap -background white -layers merge +repage output_image.png
I was able to take an image I renamed to input_image.png and run it through this command and it would spit out output_image.png with a nice little drop shadow on it just like I wanted.
I would like to say that I understand every piece of this command, but I’m not going to lie to you. I figured out from digging into this that ImageMagick installs a plethora of individual commands you can call, one of which is the one used here, “convert”. You actually never call ImageMagick, just these other commands.
So I’ve got a working command and I could have just splatted that into TextExpander and been done with it, but we can’t stop there, can we? What a pain to open up the Terminal, navigate to where the image is, copy the file, rename it to input_image.png, and run the command. What if I could create an Automator script and have it be a Service, or better yet an actual application I could put in my Finder menu bar so I could just drag the images onto it? That would be cool.
And guess what? I DID IT. ALL BY MYSELF! I feel like i made fire! I called my friend Pat Dengler on FaceTime when I got it working and she said I looked like Popeye right after he eats his spinach!
When I first started, I hard coded everything. I created a temporary directory where I’d do all the file manipulation. That meant I’d have to make sure the program ran within that one directory and it would have to exist ahead of time.
In Automator I told it to take as an input the file I was going to select in Finder, then copy it to the temp directory and rename it input_image.png. Then here’s the crazy part, I added a Shell Script block to the Automator script. Oh sure, Bart does Shell Scripts in his sleep but I’ve never done one on my own before. In the shell script I told it to run the Terminal commands I’d figured out. I added a step to the shell to move the output image back into a folder that I knew was never messy (Hazel cleans it up for me) and then a step to throw the duplicate input file in the trash.
And it didn’t work! A little bit more of the googles and I found a post in StackExchange (like Stackoverflow) where someone explained that Automator doesn’t know where your PATH is to the convert command. Remember learning about PATH in Taming the Terminal?
After I added the command suggested for the PATH, it worked perfectly! I could see my images get copied to the temp directory, modified, and moved to the location I specified and then the temp file tossed in the trash. It was glorious! Quick note – later after it was all working, I explained this part to Bart and he suggested that it’s better to just type the full path to the convert command because that would make it more portable to other people.
After I set the path, I saved the Automator workflow as a Service and it still ran (always a miracle). But I find Services a little bit tedious. Right click on the image file, pull down to Services, then drag over to them, scroll down down down to find the right one – way too much work!
In Automator itself you can convert your workflow to an application, but when you save it out, it saves as a workflow again! Back to the googles, and after a LOT more searching than I thought it should take, I found a video tutorial from 2012 where a guy points out a little tiny pulldown in the Save As dialog box that lets you switch from a workflow to an application. I have no idea why Apple defaults the saving of a newly converted application to workflow but that fixed my problem.
Now at any moment I can drag an image onto that application in my menubar, and boom, I’ve got a drop shadow picture. This is actually now way faster and more customized than I ever had with the abandoned Drop Shadow.
But there’s a madness that takes you over when you program. Instantly upon success, you hear a little voice in your head that says, “you know what would be even cooler?” I think that’s what makes programmers stay up all night pounding down the Red Bull. I couldn’t let it stand as it was.
 I started thinking about how it was hard coded and i had to have these temp folders and move files around. Ideally you could just grab an image file and drop it onto the application and it would query you for what you want to call the drop-shadow version and save it right there. And it would save it right next to the original.
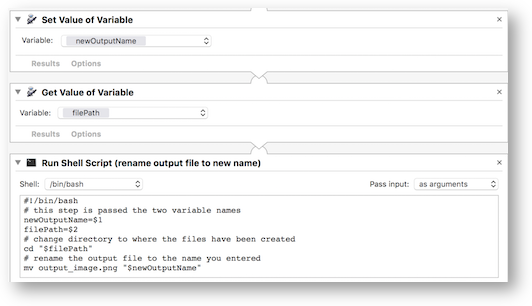
So back to the drawing board. I chatted with Bart a bit and explained that I wanted to be able to get the shell script to somehow know what directory the file came from. He didn’t tell me how to do it, and he didn’t write any of the code, but he did tip me off to look on the far right side of the shell script block in Automator for a pulldown for “Pass input”. If you change that to “as arguments” then you can grab them in the next block and use them as variables.
Armed with that little tidbit, a lot more googling and I found a command to rip the directory off of a file path. Yay! Way back when Bart taught us how to build a Service in Automator to run a local copy of xkpasswd, he taught us all about variables in Automator. I was a mad demon throwing arguments from one block to the next, setting and calling variables. It was awesome!
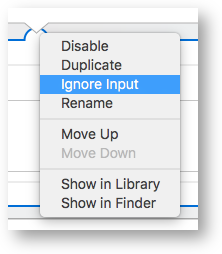
 I did find one more tidbit. Sometimes you don’t want values passed onto the next block. To change this is probably the worst UI I’ve ever seen. When you drop a block into the workflow in Automator, at the bottom it will have a little pointy triangle. The block below it will have a little semi-circle instead of a triangle. If you right click on that little semi-circle, you’ll see a few options, like to move a block up or down the workflow but also one to ignore inputs. When you do that, there’s ZERO visual clues to tell you that anything has changed. To be honest I have to open each one up to see which ones I changed!
I thought some of you might actually want to try out my fancy new application (it even has a goofy little logo!) so I put a link in the shownotes to it. There’s a little read me file in there you won’t read, but it explains the two steps to install Homebrew and ImageMagick before you try it. Of course you shouldn’t trust a file you download from the Internet (from an unsigned developer no less), so I highly advise you to open the application up in Automator before you play with it so you can see for yourself everything I’m doing.
Because I’m a professional developer now, I created a logo (it’s the letters D and S with drop shadows on them) and wrote a Read Me file (I called “You Won’t Read Me”). It includes the instructions to install ImageMagick using Homebrew so you might actually want to read it! I zipped the files together and put them in Dropbox so you can all enjoy it!
Download DropShadow here: https://www.podfeet.com/misc/DropShadow.app.zip
Now I hope the next time you see an image in Podfeet.com, you’ll appreciate what went into making it so pretty!

This is seriously cool, Allison!
ImageMagick is stupidly powerful. The first time I used it it was to automatically put watermarks on every image a photographer friend had on his website.