 If you’ve got a relatively recent DSLR or Micro Four Thirds camera, you’ve probably got built-in WiFi. This feature is pretty cool. It allows you to connect your phone to the camera’s WiFi and then download the images. Maybe your manufacturer even lets you remotely control the camera. I’ve got the Olympus E-M10 and this feature has allowed me to capture better images and yet also post the pictures to social media nearly as quickly as those posting from their phones’ cameras.
As cool as this feature is, there are a couple of downsides. Most cameras (possibly all) will not let you view or transfer RAW photos. You either have to shoot RAW + JPG or you have to convert the images in-camera to JPG before getting to play with them. Some manufacturer’s software will let you view and download RAW images, but what you don’t realize is that it’s actually converting them to JPG before it does that. A recent update to the Olympus Share software now lets me view RAW images but I tested the download and it was a JPG upon arrival.
My E-M10 has a dedicated app and the remote control capabilities are pretty cool. I can change white balance, exposure and more. But there are a few things that I can’t do with it, notably have fine control over bracketed shooting, doing time-lapse photography and more.
Now that I’ve set the stage (or perhaps we could call it “the problem to be solved”), I’d like to tell you about an app called Cascable from cascable.se that might be a one-stop shopping app to download RAW photos, provide more advanced remote control of your camera and a lot more.
I have to say I struggled a bit with doing this review, not because of any shortcomings in Cascable but because how much advantage it gives you will entirely rest on the capabilities of your camera and the tools its manufacturer already gives you. I am already anticipating the emails that will say, “Well with Canon’s software I can already DO that…” So let me tell you about the app and what it does for me and my Olympus since that’s all I can talk to.
 Every camera manufacturer has implemented a significantly different way of communicating with the outside world from their cameras. Even if they share basic protocols, the commands they accept vary wildly. This means that for the developers of Cascable to do their magic, they have to add support for manufacturers individually, which takes quite a lot of time. As of right now the app works with Canon, Nikon, Olympus and Sony but they don’t yet support Fuji. Since every camera is different as well, they have a compatibility chart (cascable.se/…) to show you what you can expect Cascable to be able to do for your particular camera. It doesn’t cover every single aspect of the tool but it will give you a good starting point.
Cascable is available for Mac and iOS, and they use the in-app purchase model on the iOS version. The free version of the iOS app will allow you to see the interface of Cascable to find out if it’s pleasing to you, but the feature set is very limited. You will want to buy at least one of the options to get the value out of Cascable. We’ll walk through the paid-for features in a minute but let’s talk about what you get for free first.
Cascable gives you remote control of your camera from your IOS device, and for free will give you full exposure control of your camera. If your camera doesn’t have a dedicated iOS app to do this already, this might be a good feature for you. I use the remote control of my Olympus when I want to take a group photo but I want to be in it too. The free version of Cascable also lets you have overlays like a histogram and gridlines.
Still in the free category, they have two calculation pages in the app. The first one will help you adjust your shutter speed correctly to compensate for the use of a neutral density filter. You drag a slider to set the initial shutter speed, then set the density for your given filter, and it tells you the shutter speed to use. The second calculator helps you determine the maximum shutter speed and focal length you can use for a given camera to capture stars without blurring. You set the focal length and then choose a sensor size and it tells you the maximum shutter speed you can use. Both of these features are useful but I suspect they’re kind of one time use. Once you know the answer for your camera and lens you’re pretty much done.
It was pretty obvious to me that the good stuff was in the in-app purchases. They sell three different feature sets: Remote Control, Photo Management, and Night Mode, each of which are $10 or you can buy a bundle with all three for $25. I’m most excited about the Photo Management set of tools so let’s start there.
Photo Management on iOS
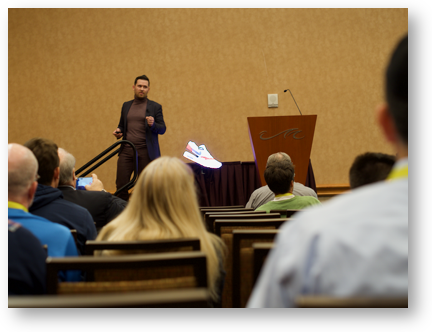 I think an example of how I used Cascable’s Photo Management tools while at CES would illustrate the value. We were at a press event called LaunchIt where companies had about 10 minutes to pitch their idea in front of angel investors such as Robert Scoble. The representative of a company Kino-Mo started this gizmo twirling in front of him with some lights on it and suddenly there was a tennis shoe right out in the middle of the crowd. It was an honest to gosh hologram and it was unbelievable. The shoe was slowly rotating in 3D, and they were unpeeling the tread from the shoe as it moved in front of us. It was crazy cool.
So I’m about 20 or 30 rows back in a poorly lit conference room with a 3D hologram I want to capture and immediately share on the Internet. Clearly my super capable iPhone 7+ is not the tool for the job. I grabbed my Olympus E-M10, swapped in my 300mm equivalent lens and started shooting. I wasn’t having a lot of success and Steve suggested I go for a longer exposure. I went into shutter priority, slowed it down to 1/20th of a second and dialed the exposure compensation down two full stops so the shoe wasn’t blown out. I kept it at ISO 200 to eliminate the noise. I did rapid fire and got one awesome shot.
So here I am in this conference room and I want to work on this RAW photo to really make it pop. I turned on the WiFi on my camera, and from my iPhone I joined that WiFi network. In Cascable, my camera showed up, with an icon asking to be tapped to show a list of images. Note that these are RAW photos that the Olympus app never would have shown me. From there I could simply tap to download, but I didn’t know which one was the good one.
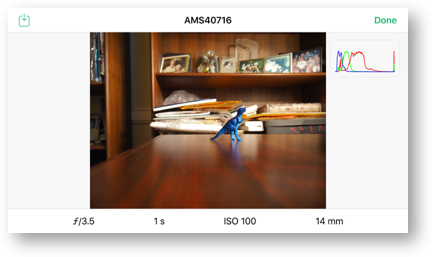
With Cascable I can tap on each one and see them full screen along with a histogram and the EXIF data for the shot. I can even zoom in to verify the photo is download-worthy. I found the best shot, downloaded and from there I could edit the RAW photo within Cascable or I could go right into Photos to do my RAW edits.
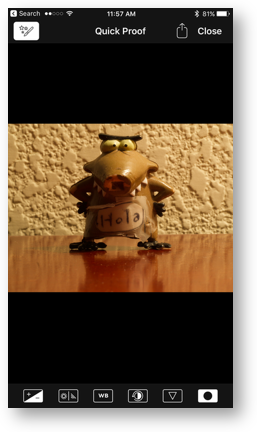 I should warn you that camera WiFi is really slow. A 16MB file from the E-M10 takes about 30 seconds to come down so the ability to preview them is essential. The editor in Cascable is called Quick Proof and it allows you adjust exposure, highlights and shadows, white balance, contrast, saturation, add sharpening, and add a vignette. You get sliders for each of these controls. I would like to see a bit more information on the controls, such as on the tint feature, which way do I slide to go more blue? The changes are a little bit slow but again, I’m editing a RAW photo on a phone. In my CES example, I also wanted to crop too so I just pressed the share sheet button and sent it up to Photos for my final edits.
I was able to make this photo look awesome and get it posted to social media while everyone else was staring at really bad mobile phone photos. I was hooked on Cascable. Totally worth $10 to buy the Photo Management Pro tools. I was doing this all on an iPhone but imagine this on an iPad. You’d be able to see a huge version of the photo and really know whether you’ve captured a shot while in the field. Even if you didn’t pull the photos down right away, knowing you missed a shot and need to take it again could be invaluable.
Cascable includes the ability to delete bad images from your camera and I would love that but when I tested it, the functionality wasn’t available on my older Olympus camera.
Remote Control
The second most valuable in-app purchase (to me at least) is Remote Control. Even if you already have a remote control app from your camera manufacturer this might still be worth the next $10 in your purse. With the Olympus tool, I can already take photos using my phone, I can change the aperture, shutter speed, exposure compensation, ISO and white balance. I can change how fast images get taken with rapid fire, and I can focus by tapping on the shutter on screen.
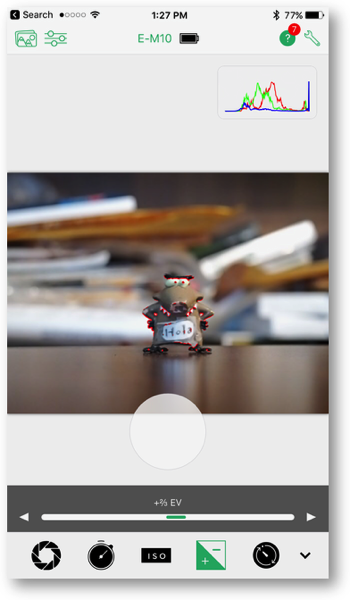
Cascable’s Remote Control functions do all the same things but add some functionality. For example, my camera supports an option called focus peaking. This helps in manual focus by zooming in on the subject as you turn the focus ring and highlighting in white whatever is in focus. With Olympus’ control software that functionality isn’t available but with Remote Control from Cascable I can use focus peaking. If I’m in autofocus mode, in Remote Control I can tap on the screen right on my subject.
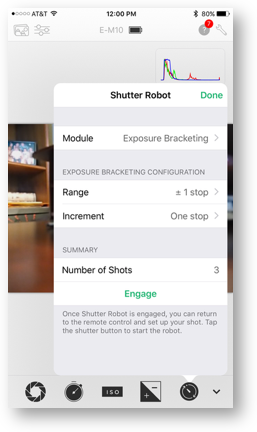 But the real advantage of Remote Control is the feature they call Shutter Robot. With Shutter robot you can set up a simple self timer from 1 second to 60 minutes and you can control your exposure with a bulb timer.
Shutter Robot can also provide you an intervalometer (a new word I learned) which is a repeating timer for shooting time lapses. You set the number of exposures you want, and the interval between them. I tried taking a series of photos with a dinosaur walking across my desk but I wasn’t very good at it so I won’t share them!
Finally Shutter Robot can take automatic exposure bracketing for use in creating high-dynamic-range images. My camera can do this in-camera, but it’s actually more limited than what I can do with Shutter Robot. The E-M10 is limited to 5 specific sets of exposure settings and number of exposures. If you don’t like the stock options you can go into the Bracketing section and have more flexibility but you have to count how many images you’ve taken and I always get confused!
With Shutter robot you can choose the range of stops from 1 to 3, and the increment of the stops from one to 1/2 to 1/3 of a stop. For example if I choose +/- 3 stops and increments of 1/3 of a stop, it would take 19 exposures! That’s crazy. Remember if you’re doing this kind of work with your camera, you’ve got it on a tripod, so using Remote Control from your phone is the way to go.
Once you start the exposure bracketing, it does all the work. You tap a button that says “engage” (gotta love that) and then in the live view on the iOS device you tap the shutter button and wait while it controls the camera for all of the exposures. The only tricky bit is you have to remember to disengage when you’re done with your exposure bracketing or you’ll keep getting extra shots.
It seems that every app nowadays needs to have an Apple Watch app and many of them are just silly. Cascable has an Apple Watch app and at first I thought it was silly as well until I realized it’s real value. I took our annual Christmas photo using the Olympus software, and that meant I had to tap the shutter on my iPhone. As a result, I got a mocked by people for having my phone out in the photo. With Cascable I can simply tap my wrist instead and look much more natural in the resulting photos.
Night Mode
Finally the last of the three options you can buy is called Night mode. It is simply the ability to have the app in a dark theme. I like Night Mode, and if you’re an astral photographer it might be a critical feature, but for $10 I’m not sure it’s quite worth that.
Cascable Transfer for Mac
You can also buy an app called Cascable Transfer for Mac directly from cascable.se/… for $15. They have a free trial so you can see if you like it before you buy. I sure wish the Apple App Stores had trials, don’t you?
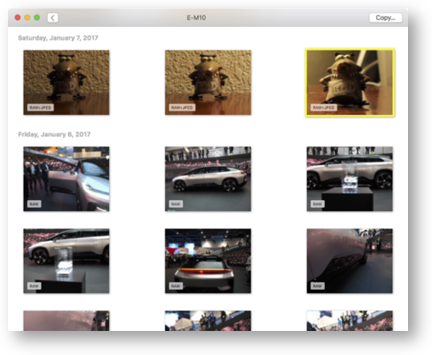 The primary function of Cascable Transfer for Mac is to let you transfer images from your camera to your Mac over the built-in camera WiFi. You might ask why on earth you’d want to do that since we’ve already established that camera WiFi is really slow. What if you have a new Mac that doesn’t have a memory card slot? What if you forgot your USB adapter so you can’t plug the camera’s cable in either? That’s the problem Cascable Transfer for Mac intends to solve.
Again you connect your Mac to the camera’s WiFi and then launch the app. The interface is super simple, you just see the images in your camera with an indicator underneath each image telling you whether the image is RAW, JPG or a RAW+JPG pair.
It wasn’t until I used Cascable Transfer for Mac that I realized that even though my camera was set to RAW, Cascable for iOS was causing my camera to take these RAW+JPG pairs. The only setting I could find was one that let you control what file to copied to your camera: RAW, JPG or both. I could not make it stop taking both. You might wonder why I care so deeply about only taking RAW. It’s because Apple made a really stupid decision in Photos that causes you to always get both when you import and you cannot delete the JPG once it’s paired with the RAW image. Without dragging along unneeded JPGs, my photos library is over 400GB so I really truly do not want those JPGs. There’s an enhancement request for Cascable!
If you tap on an image in Cascable Transfer for Mac, you’ll be able to blow it up to full screen glory on your Mac for close inspection. I can see this as being a valuable way for professional photographers to view images during a shoot to make sure they’re as good as they hope. Unfortunately I wasn’t able to connect my Mac and iPhone to the camera’s WiFi at the same time, so if a problem is found in an image and you want to retake it, you have to disconnect one device and connect the other. I presume that’s a limitation of the camera’s WiFi, not Cascable.
In viewing images in Cascable Transfer for Mac, I would like to be able to flip through images using the arrow keys (another enhancement request). As it is, you tap an image, tap the back arrow, then tap a new image. When you’re viewing a single image, you are shown the EXIF data in a really nicely formatted area at the bottom of the image.
If you really don’t have access to another way to download images, and you want to preview your images on a Mac before downloading, Cascable Transfer for Mac is worth the $15. For my money though, and having access to a big iPad for previewing images, I’d buy the entire Cascable bundle for iOS for $25, or at the very least Photo Management and Remote Control for $20. The nice thing is that they have all these different options because each person will have different requirements.
You can learn more about Cascable for Mac and iOS at cascable.se/….
