 Last week I told the story of my work with Apple to diagnose a misbehaving 2.4GHz wireless network. The TL;DR (too long, didn’t read) version is that my 2.4GHz wireless network for my Internet of Things devices was being affected by my Anker 10-port USB 3 hub.
During the live show (podfeet.com/live) George from Tulsa and Horse said in the chat room that interference between USB 3 and 2.4GHz WiFi networks is a known issue. Drew also made a comment on the blog post I posted in the topic, mentioning that there were a lot of comments about that problem on the Amazon reviews on the hub I had purchased.
I did some research on my own about this and discovered an Apple Support Article about this very problem. I’m a tad disappointed that my little friend Daniel from Apple didn’t know about this. In any case, the support article included this paragraph:
Some USB 3 devices, hard drives in particular, can generate radio frequency interference that can cause Wi-Fi and Bluetooth devices operating in the 2.4GHz band to have issues communicating with your computer. Do not place hard drives or other USB devices behind the rear of your Mac near at the hinge of your screen. The antennas for Wi-Fi and Bluetooth are located there, and USB 3 devices placed there may interfere with your wireless connections. See this white paper for more information.
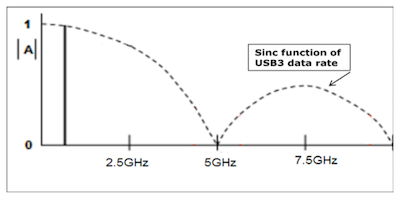
The white paper referenced in the Apple support article is one written by Intel in 2012! In this article I learned that USB 3.0 has a 5Gbit/s signal rate, and the USB 3.0 spec allows the noise to be high – up into the 2.4-2.5GHz range). They go on to say:
This noise can radiate from the USB 3.0 connector on a PC platform, the USB 3.0 connector on the peripheral device or the USB 3.0 cable. If the antenna of a wireless device operating in this band is placed close to any of the above USB 3.0 radiation channels, it can pick up the broadband noise.
So let’s review. I had my Airport Extreme approximately 2 inches behind my MacBook Pro. I then plugged the USB 3 hub into the right side of the Mac, carefully dragging the cable directly along the hinge, and placing the hub (with a spinning hard drive plugged into it) directly to the left of my Mac, so maybe 6 inches from the Airport Extreme. I basically could not have created a better way to interfere with the 2.4GHz signal from my Airport Extreme.
One of my constraints with the location of the hub was that I have that chimera cable from the Apple Cinema Display. This single cable carries power, USB and video. My MacBook Pro is to the right of the display with the power, video and USB plugged into the left side. It had to be that way because the 3 plugs coming out of the cable don’t allow it to reach to the right-side USB port. That forced the USB 3 cable to drape across the back along the hing of the MBP to get to the right-side USB connector.
I read suggestions that simply putting a USB 2 cable extension on the USB 3 hub would lower it to USB 2 speeds but at least it would stop the interference. I bought this hub so that I’d be able to have my $400 SSD plugged into it for quick access to my Photos Library, I’ll be darned if I’m going to accept USB 2 speeds!
Instead I put the extension on the USB from the chimera so that I could plug the monitor (hub) into the right side of the MBP. That allowed me to move the USB 3 hub two feet to the left of the Mac. At the same time we moved the Airport Extreme off of my desk and to a table to the right of the Mac. With the two devices now nearly three feet apart, and several ports filled with USB goodness, 2.4GHz is alive and well.
Many thanks to those of you who contributed to my understanding. I learned a lot and I hope you did too!

[…] 2.4GHz Network Restored With the USB 3 Hub in Place […]