
In our Google Plus community over at podfeet.com/googleplus, Tracey Baucells posted a problem with her main account on her Mac. For some unknown reason, on boot up, her account would freeze on the desktop picture. She did a TON of super geeky diagnostics and in the end (using Terminal fu) she was able to fix her account. I love that she was able to solve it because she was so technically savvy, like many NosillaCastaways.
I bring this story up to illustrate the wisdom of a different path. She went through all of this work so that she wouldn’t have to do a nuke and pave. For those who haven’t heard the term before, a nuke and pave means to make backup copies of your drive, erase the entire disk inside your machine and then reinstall the operating system. Finally pull back your data but not all of your settings, instead setting up things one by one, installing apps one by one until you get it all working.
She said in her notes that she’d has this account since 2007 and had only switched out one Mac in all that time back in 2010. I tried to encourage her to do a nuke and pave, but because she’s so skilled she was able to avoid that path.I am a hypocrite when I say you should do a nuke and pave when you get into trouble. Remember when I went through all that crazy work with Apple to figure out why iCloud wouldn’t sync my keyboard replacements? My little friend James tried to convince me to do a nuke and pave on my MacBook Pro. In my defense, I did install everything from scratch on this Mac in January of 2014 so just a little over 2 years ago, not the 6-9 years it’s been for Tracey.
My hesitation was primarily because my setup is fairly complex for recording, and because I have that giant 400GB Photos library I have to copy back and forth so just the reinstall of my data alone takes forever.
I still should have done a nuke and pave.
I mentioned last week that my giant Photos library takes up too much room, and that I only had 26 GB left on the internal 1TB drive on my MacBook Pro. That prompted my purchase of the Samsung T3 1TB external SSD. I just received it but haven’t got it doing what I want yet so that’s actually a story for another time. In the mean time though, I started thinking about why I only have 26GB left on my 1TB drive. I know, 400GB for photos is a lot, but where the heck is the other 600GB???
Tracey and I happened to chat a bit on Twitter after I showed the image of DiskInventoryX on last week’s show. She suggested Daisy Disk as another way to see where my disk space had run off to. It’s a great app as well, but I remembered the other tool I often use to harvest disk space, the free OmniDiskSweeper from omnigroup.com/…. Unlike DiskInventoryX and Daisy Disk, this one isn’t graphical. Instead it allows you to drill down into your drive while it’s constantly showing you folders and files with the biggest hogs at the top.
![]() Seeing the biggest hogs in each folder is cool, but it also shows you the SECOND biggest hog, so I’ll be able to see what other than Photos is taking up so much room. It seems like the Finder should be able to do this. You can see by size inside folders in column view, but it doesn’t measure the size of the folders themselves so it’s useless in discovery. OmniDiskSweeper also drills down into system files and hidden libraries – nothing can hide from its prying eyes.
Seeing the biggest hogs in each folder is cool, but it also shows you the SECOND biggest hog, so I’ll be able to see what other than Photos is taking up so much room. It seems like the Finder should be able to do this. You can see by size inside folders in column view, but it doesn’t measure the size of the folders themselves so it’s useless in discovery. OmniDiskSweeper also drills down into system files and hidden libraries – nothing can hide from its prying eyes.
The first thing I discovered was that I had some crazy big cache files hanging around. Inside the user directory there’s a Caches folder, and the top one OmniDiskSweeper found was 38GB, and it was called com.apple.bird. Common wisdom says that you can get rid of cache files and they get rebuilt if you needed them but this one got my curiosity up. I didn’t find a lot of chatter online about this bird file but did find a few places saying it had to do with iCloud syncing. That gave me pause because as you know I care a LOT about syncing things over iCloud.
I hunted the Googles and while everyone said it was ok to delete it, I decided to chat with AppleCare again. I pay for the service, so why not? The first woman asked me if I saw a red dot next to the folder, and when I told her no she said, “Go ahead and delete it.” Uh, yeah, but what IS it? How are you sure? She tried to connect me up the chain but dropped the call. So I called back, got the same kind of response, then got up a level to someone I will call Charles in honor of Dorothy’s poor answer from Charles on her iTunes music. Charles had no clue what it was but said it was ok to delete. His logic was, “I just deleted it on my computer and nothing went wrong.” #poundsheadontable.
I suggested that his experiment was slightly unscientific since we have no idea what his configuration is compared to mine. His answer was, “Well they give us these computers so that we can test stuff so my test was valid.” Sheesh. Pressed harder he said he could run it up to Engineering who will take four days minimum to respond. Having waited 2 weeks for a response from Engineering on my iCloud syncing problem before, I decided to just do a good backup and nuke the file. So far, nothing has gone wrong and I gained back 38GB of space.
Another interesting pile of lost disk space was in my user Library, Containers. There are two Photos extensions: one from Macphun’s SnapSelect and the other from Pixilemator’s Distort extension. I don’t need either of them and combined they take up 2.3GB! I’d rather have that space back, especially since I can access the tools outside of Photos without the extension.
I found another interesting thing inside that same Containers folder, it was a 1.4GB directory called com.apple.BKAgent. I was able to drill down and down and down I think four levels deep till I found a .png file I could view. Turned out to be the book cover of one of David Sparks’ awesome Field Guides on email from ages and ages ago. I knew I didn’t need the book on my drive since I could always get it back from iCloud, so boom, there’s another 1.4GB back!
I found a 690MB Transporter file in my Library too – remember how long ago I tested a Transporter and sent it back? That had to be shortly after I bought this Mac for crying out loud!
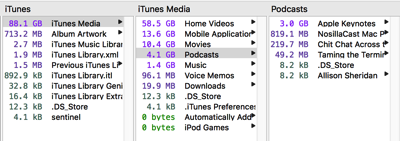
Next up OmniDiskSweeper found 4.1GB worth of iTunes podcasts. For crying out loud, I don’t even USE iTunes for podcasts! I only use it to test my feed each week and I always delete the previous week when I pull in the new one! Except evidently when I forget! I had 900MB of the NosillaCast, 220MB of Chit Chat Across the Pond, 49MB of Taming the Terminal. Remember that I already have the source files for all of these! But the dumbest thing I found in there was 3GB for two Apple keynotes. 4.1GB harvested.
I found a 1.1GB Audio Hijack file lying around from February (I swear I clean these out immediately!)
Here’s a really interesting one. OmniDiskSweeper looked at my system level Library and found a 3GB file associated with Aperture. First of all I don’t use Aperture any longer (but I might again from time to time), but what the heck is it writing inside my root Library? Turns out it was a pile of stock images they give you to play around with keywords when you’re learning to use Aperture. Boom, 3GB more disk space recovered.
For the last decade, I’ve kept every little file I use to create the show notes on my local drive. Every image, every document, everything you guys send me, all of it is local. About a year ago I moved all the audio files out and onto the Drobo so that got me some relief, but I still had the smaller files. I took a look and while they were individually small, in whole they really stole a lot of disk. I should mention that I NEVER go back and look at these, they’re really just saved as a belt and suspenders “just in case” thing. I got tired of moving the files by hand so I decided to finally break down and get Hazel and figure out how to use it. I built a rule that would take the files and move them to the Drobo when they were more than 15 days old. I like things organized by date, so the rule said to move them to the 2015 folder. When the year rolled over, I created a new rule to move them to 2016.
What OmniDiskSweeper figured out though was that I was moving them to a 2016 folder on my internal drive, not on the Drobo! What a dummy! I forget how much space it saved exactly, but it was several more GB of space.
I’ll stop describing every little thing I found but, in the end, my available space went from 26GB to 182GB free. I’m still digging too. Hey … why does my August of 2015 NosillaCast folder have a 3GB ScreenFlow file in it???
So is the lesson here to get OmniDiskSweeper and study your drive for free space? No, it is not. The lesson is to do a nuke and pave! Think of all the time I spent, using different tools and doing online searches to figure out what things were and calling AppleCare twice.
Reinstalling apps from scratch is so easy these days, no optical media to dig up, most apps are from the Mac App Store and even if you do have to dig up a license key here and there, you can keep them all safely stored away in 1Password or LastPass so you don’t even have to type the keys in.
So don’t do as I do, do as I say.
[…] Nuke and Pave or Do it the Hard Way? […]
I love this post. For two reasons:
1. I, too, find myself not following my own advice to others!
2. You satisfied your human need to learn more about your system.
Dave P.