Hello Allison and NosillaCastaways. Allister here from New Zealand, once again, with a review of one of those apps you don’t need but which you might just fall in love with.
A year ago, I subscribed to the then brand new Club MacStories newsletter. I love the information it brings me every week. Amongst the great content is always a crop of noteworthy apps and app updates. While these are predominantly iOS apps, Mac apps do appear and it is one of these that took my fancy recently and I’d like to introduce to you now.
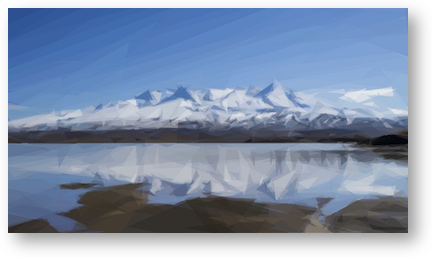
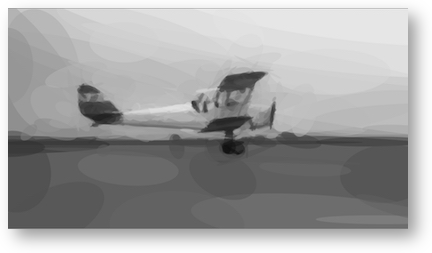
Primitive, by Michael Fogleman is a creative graphics app that uses a simple premise to turn photos (or in fact, any image) into a form of more abstract art by “recreating” the image using primitive shapes – hence the name.
Trying to describe how it does this, exactly, is a little tricky, so I’ll start by quoting from the web site.
“The program tries to find the most optimal shape that can be drawn to maximize the similarity between the target image and the drawn image. It repeats this process, adding one shape at a time.”
Perhaps I should describe the process from start to finish to give you a better idea. When you launch Primitive, it asks you to load an image and pick a shape. Loading an image can be done in the usual way by clicking the Open Image… button, or by simply dragging an image to the drop target. You then have nine options to pick from for the primitive shape to be used. Triangles, circles, quadrilaterals, rectangles, ellipses, quadratic beziers, rotated rectangles, rotated ellipses, or combo. The combo option includes a mix of triangles and the rotated rectangles and ellipses. The difference between normal and rotated for rectangles and ellipses is that the normal ones will always be aligned along the X and Y axes whereas the rotated variants are free to rotate to any angle.

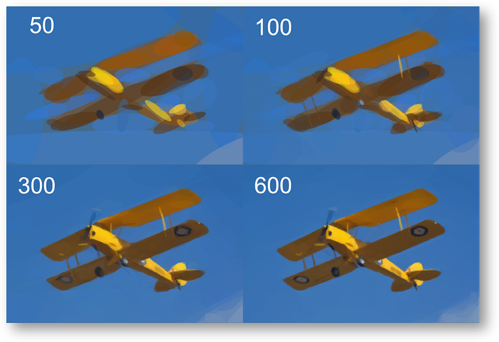
Skipping the “More Options” page for now, if you click the Run button the moderately sized window begins to fill with shapes of different colours from your image. The shapes are of the type you have chosen and are apparently randomly sized and placed, but there is method to the madness and the method is in the colour of each shape. Within a very short time you will begin to see an approximation of your input image. Even as few as 50 shapes can bring out the bolder parts of the image to a recognisable level. By the time you get to 100 it’s still what you’d call abstract, but the similarity to the original is unmistakeable. Depending on the image, between 400 and 600 shapes will usually result in an image with moderate to strong detail, although beziers tend to need much greater numbers for sufficient coverage.
Note that the colour laid down by the shapes does not exactly match the original image. Beziers are the most obvious to see this behaviour where some of the curves will draw a colour well beyond the boundary in the original image. This gives a pleasing “rough” look to well defined areas of the image.
By default, new shapes will continue to be added indefinitely until you hit the stop button. Once stopped, you can revisit the settings and either clear the image to generate again, or continue generating with new settings on top of the already-created output. This can be used to great effect, for example, by getting good coverage with a small number of solid shapes and then adding texture and detail with beziers.
Let’s return to the More Options pane, which can be accessed before you click Run, or after the generation has been stopped.

Here you can choose to run only until a specified number of shapes have been generated, or until an accuracy score is reached – this is a measure of how closely the generated image matches the original and is expressed as a percentage. Generally you’ll want to use a number over 95 if you use this method. The default method is to run until stopped manually. An update just released adds a new draw mode which allows you to “draw” with the mouse. Really what you’re doing is controlling roughly where the shapes will be generated. This can be used to great effect to bring out detail in specific areas that the random generation will take longer to get to, so you can keep a strong abstract feel across the image, but pick out important details.
There are additional options to control the transparency of each shape, which by default are at 50%, the width of bezier curves, the number of shapes to be drawn at each iteration, which can help get coverage more quickly by using the same sized and coloured shape multiple times in a single generation step, the background colour of the initial canvas, which defaults to the average colour of your image, and the “working size” of the image. This last option defaults to 256 pixels and is the size your original image is scaled to internally in order to make the shape calculations. It does not affect the final output size.
All of the shapes generated are stored as vectors, which means your output size can be anything you want. You can even output an SVG file, which applications like Adobe Illustrator or Affinity Designer can open, and work with them at any scale. I have an idea that the right image could be made into a giant poster this way – because scaling isn’t an issue.
As I said at the beginning, no-one needs this app, but it is a lot of fun to experiment with and with the right image and settings can generate some very pleasing art. You can read more about Primitive on the web site at primitive.lol and purchase from the Mac App Store for $9.99.
If you’d like to hear more from me, you can find most of my stuff over at zkarj.me including the once-again-relaunched Sitting Duck Podcast for you music lovers, and my App Store offerings like the newly launched Night Clock app and the Podfeet sticker pack.
