 If you like photography at all, please stop reading/listening to me right now and go out and buy Affinity Photo. Seriously, do it. Here’s why.
I first told you about Affinity Photo in May of 2016 and I’ve been singing the praises of this app ever since as an alternative to Photoshop. This week Serif came out with version 1.5 of Affinity Photo and it’s even MORE amazing. Not only is it amazing, they also shipped 1.5 for Windows! They explain that they purposely created one code base that could be used for both platforms so there would never be a problem with feature parity between the two.
Normally Affinity Photo is only $50 one time (no subscription service, but the price is $40 right now in the Mac App Store or directly at affinity.serif.com for Mac and Windows. Even if you miss this price and get it for the regular price, that’s crazy inexpensive for an alternative to Photoshop.
Before I dig in, I should say that I’ve run into a two bugs here and there with the new version. I had a couple of images I was working on simply go black on screen when I was tabbed away to a different image, but saving, closing and reopening it brought it back. I also seemed to hit a stall in exporting what they call slices, or parts of images. It would start to export and never make progress. This just came out a couple of days ago so I expect they’ll get this sorted. In fact, there’s already been an update.
In this new update, which you get for free if you already have Affinity Photo, they added some fantastic features. I’ll walk through some of them and explain in detail the ones I understand and have played with a bit more.
Macros
Affinity Photo now lets you record macros. If you usually like to bump up the vibrance a smidge, add a dab of clarity and compensate for your lens, you can record those steps for future use. They even give you a set of example macros so you can get the hang of how they work.
Lens Correction
Speaking of lens correction, they are now including lens correction based on profiles of thousands of lens and body combinations. I’m not much of a lens specialist and unless it’s a GoPro I don’t really notice the distortions myself, but maybe you have a more discerning eye than me and will really appreciate this. They use the list of lenses over at lensfun.sourceforge.net, so go check it out if you want to verify whether they support your lenss.
It’s a little tricky to prove to yourself that the lens correction is happening in Affinity Photo. By default, when you open a RAW file, lens correction is applied automatically if it finds your camera and lens in the database. If you want to see it uncorrected, you have to open the Assistant first, turn off the default lens correction and then open the file. It works but unintuitive that you can’t just toggle it to see the effect. Serif is great about doing video demos so I put a link in the show notes to their video demonstrating lens correction.
HDR & Tone Mapping
Probably one of the coolest features they’ve added to Affinity Photo is HDR and tone mapping right in the app. No opening separate applications. in my limited testing, I found that MacPhun’s Aurora HDR was a bit better at aligning images, but all of my tests they were hand held, which makes it really hard to do well. I’ll need to do some real tests with proper tripod photos before I can say for sure if there’s a problem.
The tools in Affinity Photo’s HDR/tone mapping set are not as advanced or extensive as Aurora HDR either. If you’re super serious about HDR, you probably want to stick with Aurora for now. I don’t often do HDR and tone mapping, so for me the presets and the sliders in Affinity Photo will probably keep me happy. I also expect that at the rate they develop Affinity Photo, these will get better over time.
Photos Integration
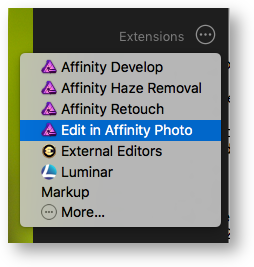 My single favorite thing about version 1.5 of Affinity Photo is that the plugin for Apple Photos now allows you to edit right in Affinity Photo and round trip back to Photos. Now you navigate to an image in Apple Photos, go into edit, hit the Extensions button, and choose Edit in Affinity Photo. Make your edits, save, close, and go back to Apple Photos and your changes are there. It works flawlessly.
Because of the limitations of Photos, you can only completely undo these changes from with Photos, you can’t go back to Affinity Photo and say move a slider a little more, or add a mask. All of the changes are one change to Photos, but you can revert to original. If you want the ability to edit more later, it’s probably best to export a TIFF, edit and save in Affinity Photo.
Focus Stacking
I love macro photography and was delighted when Steve bought me the Olympus 60mm f/2.8 lens for my E-M10 micro four thirds camera. I love taking pictures of little things, and I want to get better at it. One of the tricky parts of macro photography is that the depth of field gets so shallow that you don’t get the whole object into focus.
Serif just added a feature to Affinity Photo called Focus Stacking. The idea is that you take a bunch of photos of your subject at different focal depths and then Focus Stacking adds them all together to make one image where the entire object is in focus. I don’t know how you do this with a little bug or flower that’s moving, but for a stationary subject it can be pretty cool. Serif wasn’t the first to come up with this by the way, in fact Photoshop has had it since version 4, but it’s cool that it’s available in Affinity Photo.
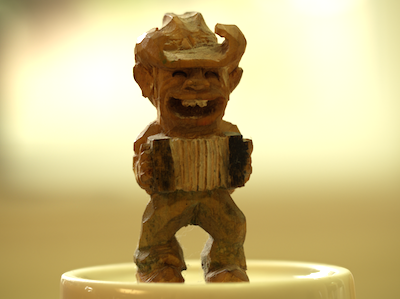
I decided to give it a try. My dad was a wood carver with a great imagination. Some of his pieces are beautiful, but my favorites are the weird, kind of creepy ones. The most interesting one I have is a tiny little farmer guy who is only about an inch and a half tall. He’s got on a cowboy hat with a big brim, for some reason he’s playing an accordion, and he’s got super creepy toothy grin. He’s spectacular. I thought he’d make a good subject for testing out focus stacking.
I stood him up on an upside down coffee mug in the kitchen, dragged out my tripod, and took 10 RAW images of him while I changed the focus manually from the closest brim of his hat, to his nose, to his silly teeth to the toes of his boots to the back of his ears.
In Affinity Photo I chose New Focus Merge, selected the images, and hit go. This is the first time I’ve seen the processors on the new MacBook Pro get pegged. Watching with iStat Menu, I saw all four cores hit the top for a couple of minutes. However, it didn’t come close to using up all 16GB of RAM. There’s been a lot of concern over the MacBook Pros only having 16, but even though I had 17 applications open when I did this operation, and I still had 3.5GB free.
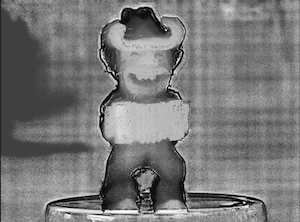
While Affinity Photo is doing the calculations, it displays some very bizarre renderings of your photo, like at one point it becomes black and white in an almost x-ray mode. When the process is complete, you don’t have a set of layers, you have a one pixel layer image. If you’re looking for manual controls, a way to shift the images in process to align them, or any features to control the process, you’re out of luck.
I put a couple of clips of the creepy little guy into the show notes.
Strange x-ray image I see while it’s building the focus stack:
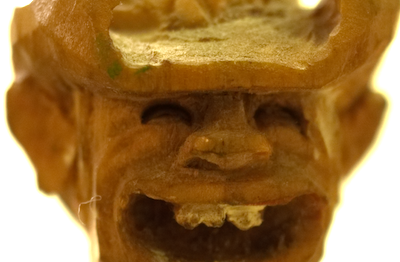
Closeup of his face in a single image with one focal point so you can see how shallow the depth of field was:
Here’s a closeup of his face in the focus-stacked image:
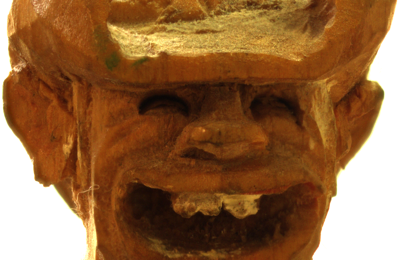
Click this thumbnail to see the full image after focus stacking. Check out his legs close up, you can even see tiny little fuzz on them I never saw with the naked eye. I’ve adjusted the exposure on him in this image so any halo you see around him is the result of my lack of skills and/or patience in cleaning up the layer mask, not the result of focus stacking.
And Much More
I haven’t gotten a chance to test much more in Affinity Photo 1.5, but I’m excited to test out their new batch processing and editing of spherical (aka 360 degree) images.
Bottom line if you haven’t bought Affinity Photo yet, now is the time to jump in and join the fun. Mac, Windows, a Mac App Store version – take your pick for $40! Check it out at serif.affinity.com

Thanks, Allison. I’ve purchased a fair amount of photography software over the years, probably too much. I really need to sort out which of these will be my go to apps. I’m a long way from conquering a complete understanding of Affinity Photo, but I’m getting there. Speaking of that, thanks for your video tutorials. They’ve been really helpful.
Thanks, George for the kind words about the video tutorials. I’m just crazy about Affinity Photo. I’m hoping to do one on some of the new features in version 1.5 for ScreenCasts Online in a few months.