 As Bart says, I took one for the team when I jumped headfirst into the deep end of Photos, abandoning Aperture. I knew I’d be limited on what I could do but I was willing to suffer because a) I really wanted all my photos everywhere, and b) because I love new software more than just about anything. Over time I’ve discovered how much you really can do with Photos to edit and improve them but there are definitely some features I miss dearly.
Problem to be Solved
In Photos you can change the lighting but it affects the entire photo. What about that shot where Uncle Marvin is wearing a hat in the family photo so his is the only face in shadow? How do you increase the exposure just on his face? Can’t do it in Photos.
Another thing I need pretty often is the ability to clone something out, like an outlet on a wall or a password on a screenshot. Photos has a healing brush which is great for getting rid of blemishes but not any good at all for my use case.
There are things I’d like to do that Aperture could never do, like use layers to create a different effect on the sky than the mountains – you used to have to export a TIFF and go over to Photoshop (Elements in my case). Of course that mean destructive editing, and a copy of the photo when you brought it back into Aperture or Photos which is not ideal at all.
The answer is the new Extensions capability in Photos. As I mentioned earlier, Macphun has a collection of tools and filters that are available as standalone apps and also as Extensions in Photos, Photoshop Elements, and Lightroom. I’m using Photos but it’s cool that we can all play no matter what tool we use.
I showed Bart how the extensions work and he found one consideration I thought I should mention. If you make edits using these tools as extensions, they are non-destructive which is awesome. You can ALWAYS undo the effect and get back to your original photo. What you can’t do with an extension though is modify an effect. Let’s say you’ve applied a sharpening effect to a photo and you’ve made the colors more vivid and you’ve brightened the sky. You can’t go back later and only adjust how much sharpening you applied. You can only get rid of all of the adjustments and start over but not tweak one of the settings To be fair, this is exactly how the REALLY EXPENSIVE Topaz tools worked in Aperture and Lightroom. It’s something to consider if you find that you often go back and tweak a photo later after you’ve let it sit for a bit.
If you think you may want to go back and tweak your settings as Bart does, you may want to export your images as TIFF files and use the standalone versions of the tools. You can save the file as an .mpi file (native format) and then make adjustments later to the image and it will save all progress, and all layers separately. Good to know that you have both options.
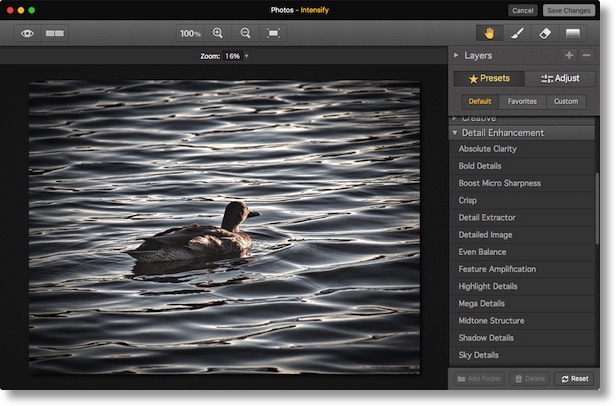
Intensify Interface
 Let’s take a look at the interface for Intensify. In Photos, you select Edit on a photo, then hit the Extensions button and choose Intensify.
The photo shows up in a new interface even though you’re still inside Photos. The right sidebar is where most of the goodies live. If you want to enhance your photo with a single button click, Intensify comes with a LOT of Presets: 8 Architectural, 9 Black & White, 16 Creative, 14 Detail Enhancement, 11 Image Tune, 5 Landscape and 5 Soft. Seriously a lot of presets. These aren’t goofy filters that make your photo look dorky. While there are some extreme adjustments like Vivid HDR, you can also simply boost the colors, or fix a dark image or improve sky details with a click of a button. Obviously I can’t run through all of them but I found many in there to like. Each preset is applied at 100% but you can move the slider down to adjust to your liking.
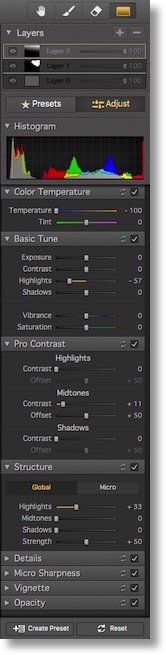
But we said we might not want to apply adjustments to the entire photo. Up at the top there’s a Layers panel. If you add a layer and then apply the preset, you can erase the areas on which you don’t want the effect applied. Each layer also has an adjustment from 0-100 so you get even finer grain control. You can also brush IN an effect on a layer.
It works easily and intuitively, which is saying a lot coming from me. I’ve studied layer masks in Photoshop on and off over the years and NEVER got the hang of them. I immediately understood how this worked in Macphun’s Intensify. Applying an effect to an entire layer and then erasing where you don’t want it to apply, or applying the effect and brushing in where you DO want it to apply was just as easy as it sounds.
You can also add a gradient effect, which allows a more graceful application across a photo. Let’s say you choose the Sky Details effects, you probably don’t want a sharp line where that starts and stops, you might want it more intense at the top and less intense as it gets to the mountains. I’m not going to describe in detail how to apply the gradient because every effort I made to do that made it sound super complicated! Instead try it yourself and you’ll quickly figure out how to change the effect to your liking. Easy peasy with Intensify.
Now by this time you’re saying, “but Allison, I need complete artistic freedom!” Don’t worry, the Adjust tab is for you, not the Preset tab. In Adjust you get 8 separate panels with multiple controls inside each panel. You get Color Temperature, Basic Tune for things like Explore and Shadows and Vibrance (I miss vibrance from Aperture!), Pro Contrast for highlights, mid ones and shadows, Structure at the Global and Micro level, Details for Highlights and Shadows, Micro Sharpness, Vignette and Opacity. And of course these are all possible on layers with masking. Now tell me that isn’t a sweet set of tools? Before I go much further, I should mention that this one tool in the Mac App Store is a grand total of $14.99. Yup. That’s pretty much everything I used in Aperture and more for $15.
I particularly love that you can fold these panels up so they’re out of your way. It makes it so much easier to see what your’e doing.
You can even create presets with your own adjustments. If you have an effect you really like to apply often, say vibrance and sharpening to your butterfly photos, you can save those as your own preset. Heck, if you’re crazy about having your own presets you can organize them into folders!
Any downsides?
Macphun published these tools first out of the gate for Photos Extensions and I think in their haste a few things got left behind. I looked for a help file when I couldn’t figure out how to undo a step so I went over to the Macphun website, and I was only able to find help on the standalone tools. Even though I have both at my disposal, the interface is slightly different.
The most visible missing feature was an undo button. I wrote to the Macphun folks and they were great about getting back to me quickly. They told me that Apple doesn’t give them access to the menu controls in Photos so they’ll have to put in their own buttons like they have in the standalone apps. In the mean time there is a solution to the missing Undo function. If you apply a control and don’t like the effect, double clicking on the slider you moved will reset it to zero. Not quite the same as undo but good enough for now.
The standalone apps include keystrokes for quick changing of tools. You can hit H for the hand (used to move the image around), D to draw with a brush and E to erase, but these keystrokes don’t work in the extensions (even though the tool tips show them). In the standalone apps you can use the standard left/right brackets to change the size of a brush, but those don’t work on the extensions either. They promised that they’ll get new versions out soon that will fill in the blanks but like I said, there’s a few rough edges out of the gate here.
More Fun Features
One of my favorite features of Intensify is that you can view your before and after photo side by side or one above the other. This really helps to be able to see whether you’ve gone over the top on an adjustment which is easy to do when you’re staring just at the changed version. You can also click and hold down on the little eyeball button to flip back and forth between the modified and original photo, much like the M key in Aperture and Photos. You can zoom in and out with the +/- buttons at the top, jump to 100% zoomed in, fill the screen or even choose from a pulldown for specific zoom sizes.
The Macphun folks connected me with an engineer working on Intensify because I seem to have found a bug with changing the view when an external monitor is connected (a 27” Apple Cinema Display over DisplayPort). I can play with the controls I just described such as side by side comparisons to my heart’s content on both of my laptops but as soon as I have a second monitor Intensify has a bad habit of stopping with an error and sending me back into Photos without saving my changes.
I tested on a different Mac (a top of the line 2015 MacBook Air) hooked up to the same Display Port 27” Apple Cinema Display and it also crashes. Without the MacBook Air, Intensify is rock solid. Then I did a final test, took the MacBook Air and hooked it up to a Thunderbolt 27” Apple Cinema Display and it still crashed.
So I’ve eliminated Display Port and the MacBook Pro itself as the culprit, looks like it’s simply external displays that cause the crashing.
To be fair, I was talking to the engineer the day before their grand release of Creative Kit 2016 so I think I was lucky to get his attention. He asked me for a log file and luckily I was able to capture a very concise crash log that should be of great help. He said they’d get it fixed straight away and based on my conversations with them over the last couple of weeks I’m sure they will!
Bottom Line
Ok, bottom line – I LOVE Intensify from Macphun and as I said in my previous post it’s so cool I moved my primary production machine to El Capitan just so I could use it more. It gives me way more than I ever used in Aperture and for $15 in the Mac App Store Intensify from Macphun is a no brainer.
Hi Allison,
I have several photo enhancement programs made by Macphun. Thanks for pointing this out to me, this might make the switch from Aperture to the new Photos App less painful.